In the world of customer support, consistency is king. A customer might have a fantastic interaction with one agent on Monday, only to have a confusing and frustrating one with another agent on Tuesday. This inconsistency erodes trust and damages brand perception. How do you ensure every customer receives the same high level of care, accuracy, and professionalism? The answer lies in a structured Support Quality Assurance (QA) review process. Many teams shy away from implementing QA, fearing it will be a complex, time-consuming, and punitive system. But it doesn’t have to be. By starting with a simple, streamlined approach, you can build a powerful engine for coaching, continuous improvement, and ultimately, happier customers. This guide will walk you through the essential steps to create a straightforward QA process that focuses on what truly matters: elevating your team and the service you provide.
What Exactly is a Support QA Review Process?
At its core, a Support QA review process is the systematic practice of evaluating customer support interactions—be it emails, chats, or phone calls—against a predefined set of quality standards. It’s about moving from anecdotal evidence (“I feel like our team is doing well”) to data-driven insights (“Our team excels at showing empathy, but we have a 15% error rate when explaining our refund policy”). It’s a formal mechanism to “inspect what you expect” from your team.
The primary goals of a Support QA program are to:
- Ensure Consistency: Create a uniform customer experience, regardless of which agent handles the interaction.
- Identify Knowledge Gaps: Pinpoint specific areas where agents or the entire team need more training or clearer documentation.
- Improve Internal Processes: Discover broken workflows, confusing macros, or inefficient tools that are hindering agent performance.
- Boost Customer Satisfaction (CSAT): By improving the quality of individual interactions, overall customer satisfaction and loyalty naturally increase.
- Provide Objective Coaching Data: Arm managers with specific, actionable examples to use during 1-on-1s, transforming feedback from vague suggestions into targeted coaching.
It’s crucial to distinguish QA from pure performance management. While QA data informs performance, its spirit is developmental, not disciplinary. Performance management often focuses on quantitative metrics like tickets closed per hour or first response time. QA, on the other hand, focuses exclusively on the quality and substance of those interactions. It answers the question, “We responded quickly, but was it the right response?”
The 4 Core Steps of a Simple QA Process
The secret to a successful QA program is starting small and staying consistent. You don’t need expensive software or a dedicated analyst to begin. You just need a clear framework. Here are the four fundamental steps to build your simple process.
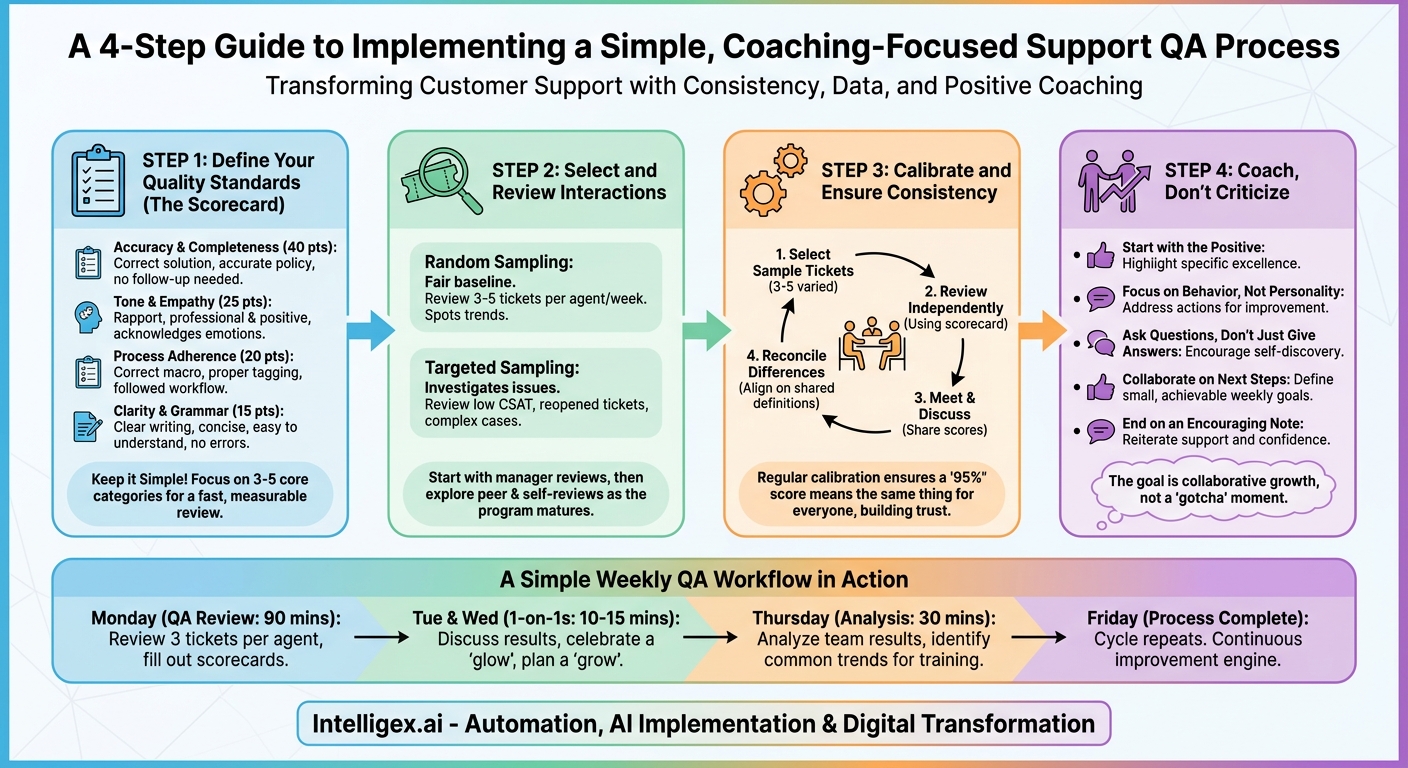
Step 1: Define Your Quality Standards (The Scorecard)
You can’t measure quality if you haven’t defined what it means for your team. The foundation of any QA process is the scorecard—a simple rubric used to grade each interaction. A complicated scorecard with dozens of criteria will sink your program before it even starts. Begin with 3 to 5 core categories that represent the pillars of a great customer interaction.
Here’s a sample simple scorecard structure:
-
Accuracy & Completeness (40 points): This is non-negotiable. Was the technical solution correct? Was the policy information accurate? Did the agent provide all the necessary information, or did the customer have to write back for more details? This is often a binary category—the answer was either right or it wasn’t.
- Example question: Did the agent provide a complete and correct resolution to the customer’s issue?
-
Tone & Empathy (25 points): This covers the human element. Did the agent build rapport? Was their tone professional, friendly, and appropriate for the situation? Did they acknowledge the customer’s frustration or excitement? This is less about what was said and more about how it was said.
- Example question: Did the agent use empathetic language and maintain a positive and professional tone?
-
Process Adherence (20 points): This measures whether the agent followed your internal best practices. Did they use the correct macro? Did they tag the ticket properly for reporting? Did they escalate the issue according to the defined workflow? This category helps ensure your backend data stays clean and your processes run smoothly.
- Example question: Did the agent correctly follow all required internal procedures for this type of ticket?
-
Clarity & Grammar (15 points): This assesses the professionalism of the communication. Was the agent’s writing clear, concise, and easy for the customer to understand? Was it free from major spelling and grammatical errors that could cause confusion or damage credibility?
- Example question: Was the communication well-written and easy to comprehend?
By keeping your scorecard this simple, you make the review process fast and focused. Each interaction gets a score out of 100, giving you a clear, quantifiable measure of quality that you can track over time.
Step 2: Select and Review Interactions
Once you have your scorecard, you need to decide which interactions to review. The goal is to get a representative sample of each agent’s work. There are two primary methods for selecting tickets:
Random Sampling: This is the most common and fairest approach for ongoing QA. You randomly select a set number of interactions per agent per review period. A great starting point is to review 3-5 tickets per agent, per week. This is a large enough sample to spot trends but small enough to be manageable for a busy team lead or manager.
Targeted Sampling: This method is incredibly useful for investigating specific issues. For example, you might want to review:
- Interactions that received a low CSAT score.
- Tickets that were reopened by the customer.
- Complex interactions that involved multiple replies.
- Conversations about a new product or feature to see how it’s being explained.
A healthy QA program uses a combination of both. Rely on random sampling for your regular, baseline quality score, and use targeted sampling to deep-dive into problem areas as they arise.
Who should do the reviewing? In a simple process, this responsibility typically falls to the team lead or manager. They have the most context on team performance and are directly responsible for coaching. As your program matures, you can explore peer reviews, where agents review each other’s work, or even self-reviews, where agents score their own tickets to develop self-awareness.
Step 3: Calibrate and Ensure Consistency
This step is the secret sauce to a credible QA program. If two different managers review the same ticket and give it wildly different scores, your agents will lose faith in the process. Calibration is the act of getting all reviewers on the same page.
A simple calibration session works like this:
- Select Sample Tickets: Choose 3-5 varied interactions to review as a group.
- Review Independently: Have all reviewers (e.g., all the team leads) score these tickets on their own using the official scorecard, without consulting each other.
- Meet and Discuss: Hold a meeting where you go through the tickets one by one. Each reviewer shares their score for each category.
- Reconcile Differences: When scores differ, talk it out. The person with the higher score explains what they saw that was positive, and the person with the lower score explains their reasoning. The goal isn’t to argue, but to understand each other’s perspectives and align on a shared definition of the quality standards. For example, you might decide that forgetting to use the customer’s name once is a minor tone issue, but forgetting it three times is a major one.
By holding these calibration sessions regularly (e.g., once a month), you ensure that a “95%” score means the same thing no matter who is doing the review. This fairness is absolutely essential for agent buy-in.
Step 4: Coach, Don’t Criticize
All the data you collect is meaningless if you don’t use it to help your team grow. The final—and most important—step of the QA process is coaching. The way you deliver feedback will determine whether your QA program is seen as a supportive tool for growth or a dreaded “gotcha” machine.
The cardinal rule is: coach, don’t criticize. Frame the QA review as a collaborative effort to help the agent succeed.
Here’s how to structure a great QA coaching session, typically during a weekly 1-on-1:
- Start with the Positive: Always begin by highlighting something the agent did exceptionally well. Be specific. Instead of “Good job on this ticket,” say, “I was so impressed with how you handled this angry customer. Your empathetic language in the first reply completely de-escalated the situation.”
- Focus on Behavior, Not Personality: When addressing areas for improvement, focus on the specific action. Instead of “You were unclear,” say, “In this sentence, the wording could be confusing for a new user. Let’s brainstorm a clearer way to phrase it.”
- Ask Questions, Don’t Just Give Answers: Encourage self-discovery. Ask questions like, “What was your thought process when you sent this reply?” or “Looking back, is there anything you might have done differently here?” This fosters critical thinking and ownership.
- Collaborate on Next Steps: Work together to define a single, small, and achievable goal for the upcoming week. It could be, “This week, let’s focus on double-checking the ticket tags before you hit send,” or “Let’s try to personalize the opening line of every email.”
- End on an Encouraging Note: Reiterate your confidence in the agent’s ability to grow and succeed. Remind them that the goal of this process is to support them.
A Simple Weekly QA Workflow in Action
Let’s put it all together. Here is what a simple, sustainable weekly QA workflow could look like for a support manager:
- Monday: The manager dedicates 90 minutes to QA. They randomly select and review 3 tickets from the previous week for each of their 5 agents, filling out the scorecard for all 15 tickets.
- Tuesday & Wednesday: During their scheduled 1-on-1s, the manager spends 10-15 minutes discussing the QA results with each agent. They focus on celebrating one “glow” (a highlight) and discussing one “grow” (an opportunity for improvement).
- Thursday: The manager spends 30 minutes analyzing the team-wide results. They notice a common trend: several agents are struggling to explain the new billing feature. They decide to prepare a 5-minute refresher training for the next team meeting.
- Friday: The process is complete for the week. The manager has provided individual coaching, identified a team-wide training need, and collected valuable data on service quality. The cycle repeats the following week.
Implementing a Support QA review process is one of the highest-leverage activities a support leader can undertake. By starting with a simple, four-step framework—a clear scorecard, a consistent review cadence, regular calibration, and a coaching-first mindset—you can demystify quality and transform it into a measurable, repeatable skill. You’re not just checking boxes; you’re building a culture of excellence, one customer interaction at a time. The investment is small, but the returns in team morale, agent development, and customer loyalty are immeasurable.
Your Next Read:
Category:
Get a FREE
Proof of Concept
& Consultation
No Cost, No Commitment!