The exhilarating feeling of hitting the “publish” button on a blog post is a creative rush many of us chase. It’s the finish line, the moment our hard work goes out into the world. Yet, for every published article, countless others languish in a digital purgatory—a “Drafts” folder filled with half-formed ideas, partially written paragraphs, and abandoned outlines. The difference between a prolific, successful blog and a content graveyard isn’t just about having good ideas; it’s about having a rock-solid, repeatable system. It’s about building a pipeline.
Think of your blogging process not as a single, monstrous task, but as a factory assembly line. Each station has a specific job. Raw materials (ideas) enter one end, and a polished, valuable product (a published post) emerges from the other. When you systematize this process, you eliminate decision fatigue, conquer writer’s block, and ensure a consistent level of quality for every piece you produce. This isn’t about stifling creativity; it’s about building a framework that lets your creativity flourish. Let’s walk through the four key stages of a high-efficiency blog publishing pipeline.
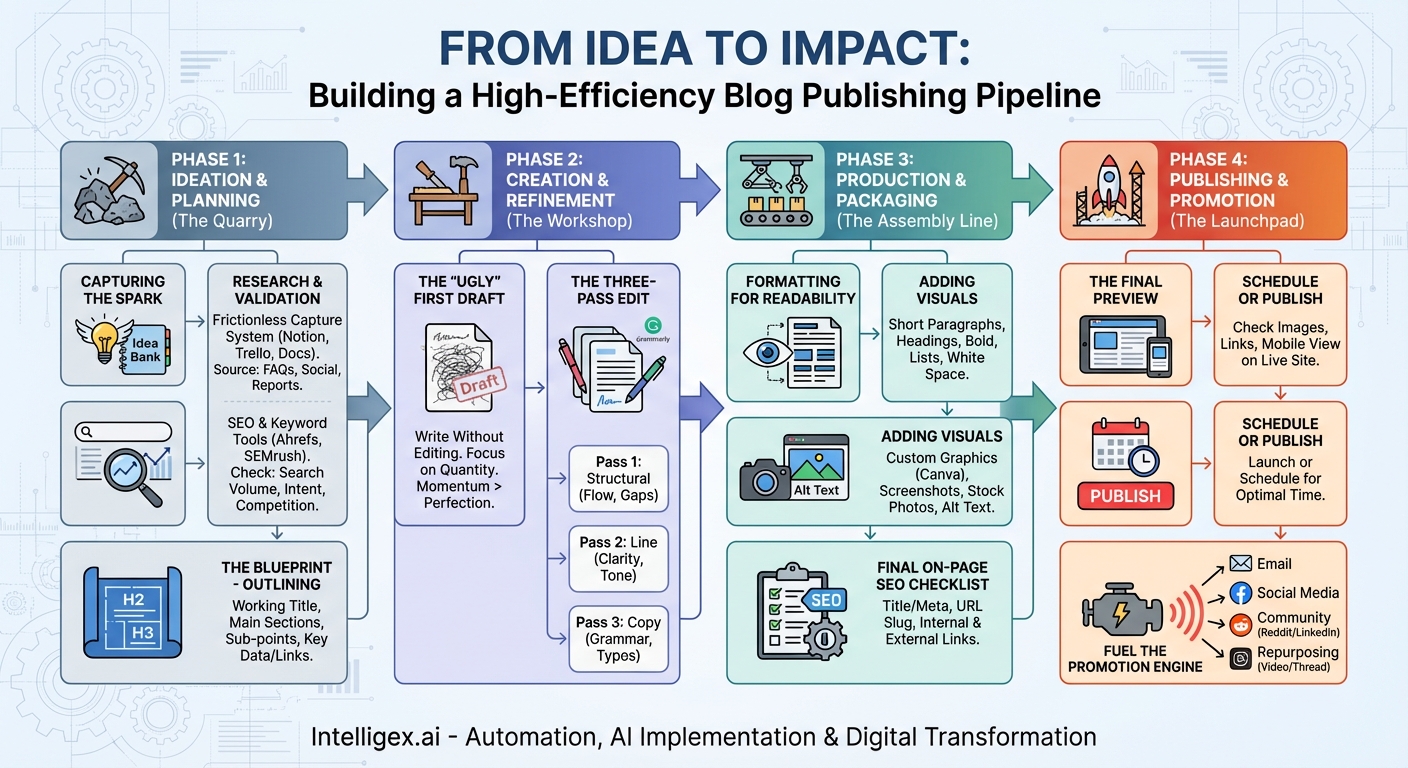
Phase 1: Ideation & Planning (The Quarry)
Before you can build anything, you need to gather your raw materials. This initial phase is all about finding, validating, and structuring your ideas so they have the best possible chance of success. Rushing this stage is like trying to build a house without a blueprint.
Step 1: Capturing the Spark
Ideas are fleeting. They strike in the shower, on a walk, or in the middle of a conversation. The first rule of a good pipeline is to have a frictionless capture system. This isn’t the time for judgment or vetting; it’s about volume. Your goal is to create an “idea bank” you can draw from at any time.
- Digital Tools: Use apps like Notion, Trello, Evernote, or even a simple Google Doc. Create a board or list titled “Blog Ideas.”
- Analog Methods: A dedicated notebook or a stack of index cards can be just as effective.
- Sources of Inspiration: Pay attention to questions your customers ask, conversations happening on social media, interesting statistics from industry reports, and content from other creators (for inspiration, not imitation).
The key is to make it so easy to add an idea that you never lose a potential gem.
Step 2: Research & Validation
An idea is not yet a topic. A topic is an idea that has been validated. This step is about putting your idea through its paces to see if it’s worth pursuing. A major part of this is Search Engine Optimization (SEO). You want to write content that people are actually looking for.
Use tools like Google Keyword Planner, Ahrefs, or SEMrush to investigate your idea. Ask these questions:
- Search Volume: Are people searching for this topic? A volume that’s too high might be too competitive, while zero volume means no one is looking for it. Find the sweet spot for your site’s authority.
- Search Intent: What does the user really want when they search this term? Are they looking for a definition (informational), a comparison of products (commercial), or a place to buy (transactional)? Your content must match this intent.
- Competition: Look at the top-ranking articles for your target keyword. Can you create something significantly better, more comprehensive, or with a unique angle? If not, you may want to refine your topic.
Step 3: The Blueprint – Outlining
Never start writing a blog post with a blank page. An outline is your single most powerful weapon against writer’s block. It turns the daunting task of “writing a 1500-word post” into a manageable series of smaller tasks. Your outline is the skeleton; the writing process is just adding the muscle and skin.
A good outline should include:
- A Working Title: It doesn’t have to be perfect, but it should capture the core promise of the post.
- Main Sections (H2s): These are the major pillars of your argument or story.
- Sub-points (H3s & H4s): Break down each main section into smaller, more specific points.
- Key Data/Links: Note any statistics, quotes, or external resources you plan to include in each section.
With a detailed outline, the writing process becomes more like connecting the dots than painting a masterpiece from scratch.
Phase 2: Creation & Refinement (The Workshop)
With your blueprint in hand, it’s time to head to the workshop. This is where the messy, creative work of drafting and editing happens. The key here is to separate the act of creation from the act of critique.
Step 4: The “Ugly” First Draft
Author Anne Lamott calls this the “shitty first draft.” The goal is not perfection; it’s momentum. Turn off your internal editor and just write. Follow your outline and get all of your thoughts onto the page. Don’t worry about awkward phrasing, typos, or finding the perfect word. Just get the raw material down.
Perfectionism is the enemy of progress. Give yourself permission to write badly. You can’t edit a blank page, but you can always improve a flawed one. This single mindset shift can dramatically increase your output.
Focus on getting from the beginning to the end of your outline. This is often the hardest part, but by focusing on quantity over quality at this stage, you build a foundation you can polish later.
Step 5: The Three-Pass Edit
Once your first draft has had a little time to breathe (ideally a day or two), it’s time for editing. Don’t try to fix everything at once. Instead, use a structured, multi-pass approach.
Pass 1: The Structural Edit
Read through the entire post from a high level. Ignore grammar and spelling. Ask the big questions:
- Does the argument flow logically from one section to the next?
- Are there any gaps in the information?
- Is this section better placed somewhere else?
- Is the introduction compelling and the conclusion satisfying?
This is where you might delete entire paragraphs or rearrange the order of your H2 sections. It’s about the overall shape and coherence of the piece.
Pass 2: The Line Edit
Now, go through the post sentence by sentence. This is where you focus on clarity, style, and impact. Read it out loud to catch awkward phrasing. Your goals are:
- Clarity: Is each sentence easy to understand?
- Conciseness: Can you say the same thing with fewer words? Eliminate jargon and filler.
- Tone: Does the writing sound like your brand? Is it engaging?
Pass 3: The Copy Edit
This is the final, meticulous polish. You are hunting for objective errors. Use tools like Grammarly or ProWritingAid, but don’t rely on them exclusively. Manually check for:
- Spelling mistakes
- Grammatical errors
- Punctuation issues (e.g., comma splices)
- Typos
This final pass ensures your post looks professional and credible.
Phase 3: Production & Packaging (The Assembly Line)
Your content is written and polished. Now it’s time to package it for public consumption. A great article can fail if it’s presented as an unreadable wall of text. This phase is about user experience and technical optimization.
Step 6: Formatting for Readability
People don’t read online; they scan. Your formatting must guide their eyes to the most important information.
- Short Paragraphs: Keep paragraphs to 2-4 sentences max.
- Headings and Subheadings: Use your H2s and H3s to break up the text and signal topic changes.
- Bold and Italics: Use bolding to emphasize key phrases and make the text skimmable.
- Bullet Points & Numbered Lists: Use lists (like this one!) to present information in an easily digestible format.
- White Space: Don’t be afraid of empty space on the page. It gives the reader’s eyes a place to rest and makes the content feel less intimidating.
Step 7: Adding Visuals
Visual content increases engagement and helps break up long blocks of text. Every blog post should have, at a minimum, a featured image. Consider adding:
- Custom Graphics: Tools like Canva make it easy to create branded graphics, charts, and quotes.
- Screenshots: If you’re writing a tutorial, use annotated screenshots to illustrate each step.
- Stock Photos: Use high-quality stock photos from sites like Unsplash or Pexels, but try to choose images that look authentic and relevant.
Crucially, always add descriptive alt text to your images. This is essential for accessibility (for screen readers) and SEO (it tells search engines what the image is about).
Step 8: Final On-Page SEO Checklist
Before you move the post into the “Ready to Publish” queue, run through a final SEO check within your CMS (like WordPress):
- SEO Title & Meta Description: Write a compelling title tag and meta description that includes your target keyword and entices users to click from the search results page.
- URL Slug: Ensure the URL is short, descriptive, and contains your primary keyword (e.g., `yourblog.com/blog-publishing-pipeline`).
- Internal & External Links: Add at least 2-3 links to other relevant posts on your blog (internal links) and 1-2 links to authoritative external sources.
Phase 4: Publishing & Promotion (The Launchpad)
This is the final stage where your post goes live and you begin the crucial work of getting it in front of the right audience.
Step 9: The Final Preview
Before you hit the big red button, use the “Preview” function. Read the entire post one last time on your live site template. Check everything:
- Are all the images loading correctly?
- Do all the links work and open in a new tab where appropriate?
- How does it look on a mobile device? Is the text readable and are the images sized correctly?
It’s amazing how many small errors you can catch in this final preview step.
Step 10: Schedule or Publish
With the final check complete, it’s time to launch. You can either publish it immediately or schedule it for a time when your audience is most active. Congratulations! But remember, your job isn’t done.
Step 11: Fuel the Promotion Engine
Publishing is not the end of the pipeline; it’s the beginning of the promotion cycle. A great post that no one sees has zero impact. Your promotion plan should be just as systematic as your creation plan.
- Email Newsletter: Your most loyal readers are on your email list. This should always be your first stop.
- Social Media: Share the post across your relevant social channels. Create custom graphics for each platform and write unique copy that teases the content.
- Community Engagement: Share your post in relevant Reddit communities, LinkedIn groups, or Slack channels (always check the rules first!). Don’t just drop a link; provide context and start a conversation.
- Repurposing: In the weeks that follow, turn your post into a Twitter thread, a series of Instagram graphics, a short video, or a LinkedIn carousel.
By treating your blog not as a series of one-off creative acts but as a structured, repeatable pipeline, you transform your content creation from a source of stress into a predictable engine for growth. Each step builds on the last, ensuring quality, consistency, and, most importantly, a steady stream of valuable content that gets you closer to your goals with every click of the “publish” button.
Your Next Read:
Category:
Get a FREE
Proof of Concept
& Consultation
No Cost, No Commitment!