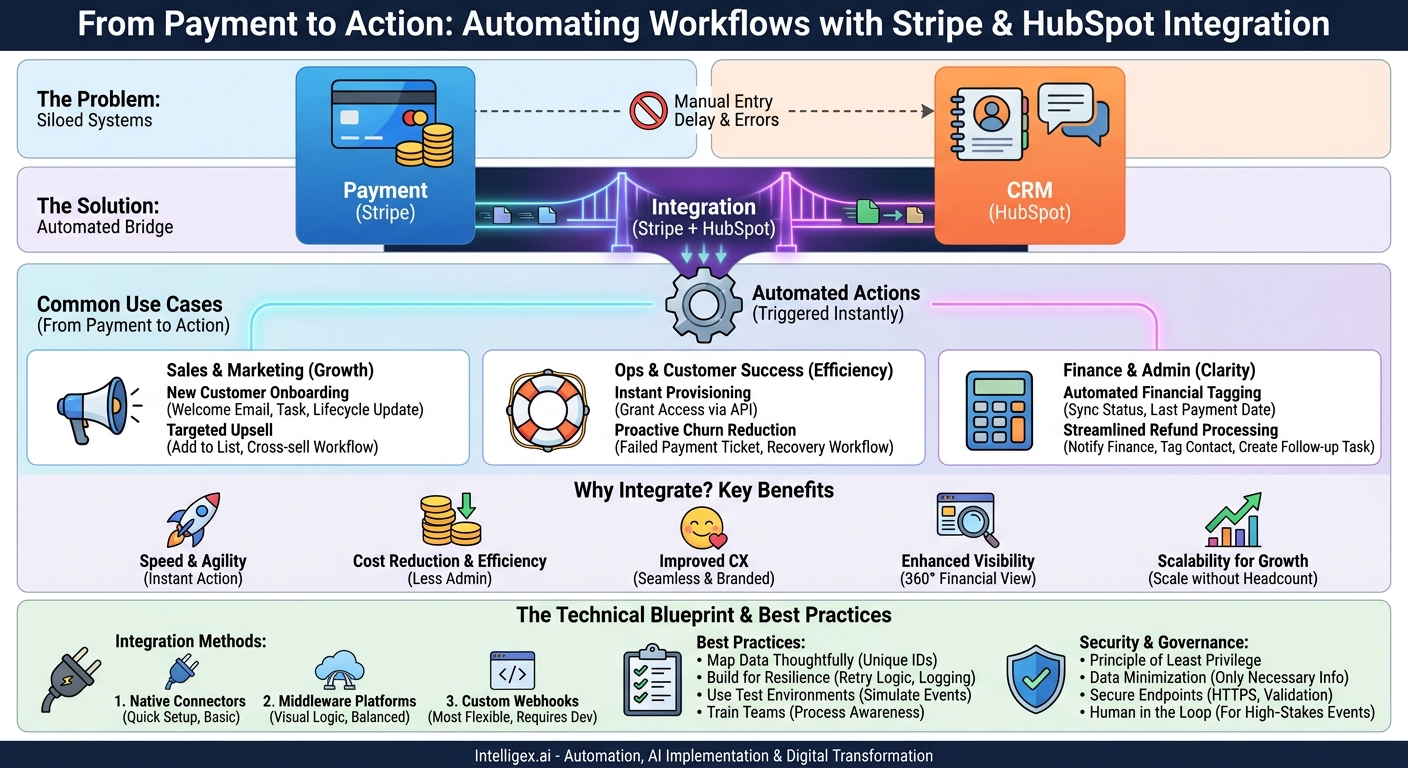
In most companies, the moment a customer makes a payment is handled by one system, while the entire customer relationship lives in another. A payment happens in a tool like Stripe, but the onboarding, support, and marketing conversations happen in a CRM like HubSpot. This gap is more than an inconvenience; it’s a source of delay, manual error, and disjointed customer experiences. When these two worlds don’t speak the same language, your teams are forced to act as manual translators, wasting time and creating opportunities for critical tasks to fall through the cracks.
Connecting payment events directly to your CRM transforms a simple transaction into a powerful trigger for automated, intelligent actions. It’s about ensuring that the moment a customer commits to you financially, your business responds instantly and appropriately. This integration is a foundational step in building a scalable, efficient, and customer-centric operation. By bridging this divide, you can automate everything from welcome sequences and service provisioning to payment recovery and financial reporting, all without a single line of manual data entry.
Why Bridge the Gap Between Payments and Your CRM?
Automating the flow of information between your payment processor and your CRM is not just a technical upgrade. It delivers tangible business value across several key areas, creating a more resilient and responsive organization.
Speed and Agility
When a customer pays, their expectation is immediate action. A manual process where the finance team has to notify the customer success team, who then triggers an onboarding sequence, can take hours or even days. An integrated system closes this gap to mere seconds. A successful payment can instantly kick off a welcome email, grant access to a digital product, or assign a task to an onboarding specialist. This speed not only meets modern customer expectations but also accelerates your entire service delivery pipeline.
Cost Reduction and Efficiency
Manual processes are expensive. They consume valuable employee time with repetitive tasks like data entry, cross-referencing spreadsheets, and internal follow-ups. Integrating Stripe and HubSpot automates these workflows. Consider the cost of chasing failed payments. An automated dunning process, triggered by a `charge.failed` event, can handle initial outreach without human intervention, freeing up your finance or success teams to focus on more complex issues. This reduces administrative overhead and minimizes the risk of costly human errors.
Improved Customer Experience
The post-purchase experience is a critical, yet often overlooked, part of the customer journey. A seamless integration ensures this experience is smooth and professional. For example, instead of a generic, unbranded payment failure email from Stripe, you can trigger a customized sequence from HubSpot. This sequence can use the customer’s name, reference their specific subscription, and provide helpful, on-brand instructions for updating their payment method. This turns a potentially negative interaction into a positive, supportive touchpoint.
Enhanced Visibility
How often do your sales or support staff have to ask, “Has this customer paid yet?” An integrated system puts crucial financial context directly into the HubSpot contact record. A team member can see a customer’s subscription status, last payment date, or if they have an outstanding invoice without ever leaving the CRM. This 360-degree view empowers your teams to have more informed conversations, provide better support, and identify upsell opportunities based on a customer’s payment history.
Scalability for Growth
Manual workflows are a bottleneck to growth. A process that works for 10 customers a month will break down completely at 100 or 1,000. Automation ensures that your operational processes can scale alongside your revenue. Whether you gain one new customer or one hundred in a day, an integrated system ensures each one receives the same high-quality, immediate post-payment experience, allowing you to grow without a proportional increase in administrative headcount.
Common Use Cases: From Payment to Action
Integrating payment events into your CRM unlocks powerful automation opportunities for nearly every team in your organization. Here are a few practical scenarios that demonstrate the potential.
For Sales and Marketing Teams
Payment data provides the ultimate signal of customer intent and commitment. Using it can sharpen your marketing and sales follow-up.
- New Customer Onboarding: When a `charge.succeeded` event occurs for a new customer’s first subscription payment, the integration can automatically update their HubSpot lifecycle stage to “Customer,” enroll them in a targeted “Welcome and Onboarding” email sequence, and create a task for their assigned salesperson to make a personal thank-you call.
- Targeted Upsell Campaigns: A customer’s purchase history is a goldmine. If a customer buys “Product A,” the integration can add them to a “Product B Cross-sell” active list in HubSpot. Six months later, they can be automatically enrolled in a workflow that showcases the benefits of adding Product B.
For Operations and Customer Success
This is where the integration drives immediate efficiency and improves the core service delivery experience.
- Instant Service Provisioning: For a SaaS company, a successful payment is the green light to grant access. The Stripe event can trigger a webhook that calls your application’s API to create the user’s account, sending their login credentials via a HubSpot email moments after the payment is confirmed.
- Proactive Churn Reduction: A `subscription.payment_failed` event is a critical churn indicator. The integration can instantly create a high-priority ticket in HubSpot Service Hub, assign it to the customer success manager, and enroll the customer in a gentle, multi-step payment recovery workflow that pauses after a few days if the issue isn’t resolved, awaiting human intervention.
For Finance and Administration
Automation here reduces manual reconciliation and provides a clearer financial picture within the system of record for customer relationships.
- Automated Financial Tagging: Create custom properties in HubSpot like “Stripe Customer ID,” “Subscription Status” (e.g., active, past_due, canceled), and “Last Payment Date.” The integration keeps these fields updated in real-time, providing an accurate financial snapshot on every contact record.
- Streamlined Refund Processing: When a `charge.refunded` event occurs in Stripe, the system can trigger an internal notification to the finance team via Slack or email, tag the contact in HubSpot with “Refund Issued,” and create a task for the customer success team to follow up and understand the reason for the refund, gathering valuable product feedback.
The Technical Blueprint: Connecting Stripe and HubSpot
There are several ways to connect Stripe and HubSpot, each with different levels of complexity, cost, and flexibility. The right choice depends on your technical resources and the specific needs of your workflows.
Three Primary Integration Methods
1. Native Connectors: The HubSpot App Marketplace offers pre-built applications that connect with Stripe. These are often the quickest to set up and are great for basic use cases, like syncing contact data and viewing payment history. However, they may lack the flexibility to trigger highly customized or multi-step workflows.
2. Middleware Platforms: Tools like Zapier, Make, or Workato act as a bridge between thousands of applications. They provide a visual, no-code or low-code interface to build “if this, then that” logic. You can set up a “trigger” (e.g., “New Successful Charge in Stripe”) and define a series of “actions” (e.g., “Update Contact Property in HubSpot,” “Add Contact to Workflow”). This approach offers a good balance of power and ease of use.
3. Custom Integration via Webhooks: This is the most powerful and flexible method. A webhook is an automated notification sent from one application to another when a specific event occurs. Stripe can send a webhook for virtually any event in your account. You build a small application or serverless function that “listens” for these webhooks, processes the data, and then uses the HubSpot API to perform any action you need. This method provides complete control but requires development resources.
Step-by-Step: A Basic Custom Webhook Flow
For those considering a custom integration, the conceptual process is straightforward. Here is a simplified overview of how to handle a new successful payment.
- Create a Webhook Endpoint in Stripe: In your Stripe developer dashboard, navigate to the “Webhooks” section. You will create a new endpoint and provide a URL. This URL is where Stripe will send the data. This could be a custom API you’ve built or a URL provided by a serverless platform like AWS Lambda or Google Cloud Functions.
- Subscribe to Specific Events: You don’t want your application to receive notifications for everything. Select only the events you need to act on. For this example, you would subscribe to `charge.succeeded`.
- Build Your Listener Application: This is the code that runs at your endpoint URL. Its first job is to receive the incoming data from Stripe. For security, it’s critical to verify the webhook signature to ensure the request genuinely came from Stripe.
- Identify the Customer: The webhook data from Stripe will include customer information, most importantly the customer’s email address and the unique Stripe Customer ID. Your application needs to extract this information.
- Find or Create the Contact in HubSpot: Using the HubSpot API, your application will search for a contact with the matching email address. If a contact is found, you will use their HubSpot contact ID for the next step. If not, your logic might create a new contact.
- Perform the Action in HubSpot: With the correct contact identified, your application can now use the HubSpot API to perform the desired actions. This could include updating a custom property (e.g., setting “Subscription Status” to “Active”), enrolling the contact in a specific workflow, or creating a new deal record associated with the contact.
Best Practices for a Robust Integration
A poorly planned integration can create more problems than it solves. Following best practices ensures your automation is reliable, scalable, and secure from day one.
Map Your Data Thoughtfully
The foundation of a good integration is a clean and consistent data model. Before you write a single line of code or build a workflow, decide on your “source of truth” and how data will flow. A critical best practice is to use a unique, unchanging identifier to link records. While email is a common choice, it’s not foolproof, people change their email addresses. The best approach is to store the immutable Stripe Customer ID as a custom property on the HubSpot contact record. This creates a permanent, reliable link between the two systems.
Build for Resilience and Error Handling
Systems experience downtime, and APIs sometimes fail. Your integration must be built to handle these realities. What happens if a Stripe webhook fires, but your connection to the HubSpot API times out? A robust integration includes retry logic, which attempts the action again after a short delay. It should also include logging and alerting. If an error persists after a few retries, the system should send an alert to your technical team with details about the failed event so it can be investigated manually.
Checklist for a Successful Launch
Use this checklist to guide your planning and implementation process. Rushing any of these steps can lead to problems down the line.
- Define clear business objectives: What specific problem are you solving? (e.g., “Reduce new customer onboarding time from 24 hours to 5 minutes.”)
- Map the process flow: Whiteboard the entire workflow from the Stripe event to the final HubSpot action. Include all decision points and potential failure scenarios.
- Create custom properties in HubSpot first: Build the necessary fields in HubSpot (e.g., “Stripe Customer ID,” “Subscription Tier,” “Last Payment Failed Date”) before you start sending data to them.
- Use test environments: Both Stripe and HubSpot offer developer sandboxes or test modes. Conduct all your development and initial testing using test data, never your live accounts. Simulate success, failure, and refund events.
- Implement comprehensive logging: Your integration should log every major step, such as “Received webhook for charge.succeeded,” “Found contact in HubSpot,” and “Updated contact property.” This is invaluable for troubleshooting.
- Train your teams: Once the integration is live, make sure your sales, success, and support teams know about the new data available in HubSpot and understand how the new automated workflows operate.
Measuring the Impact of Your Integration
To justify the investment and prove the value of your integration, it’s crucial to track the right metrics. Connect your automation work to measurable business outcomes.
Financial and Operational Metrics
These metrics show the direct impact on efficiency and revenue.
- Involuntary Churn Rate: This is churn caused by payment failures, not by a customer actively choosing to cancel. By implementing an automated dunning process triggered by payment failures, you can directly measure the reduction in this specific type of churn.
- Manual Hours Saved: Estimate the time your teams spent on manual data entry, reconciliation, and follow-up before the integration. After implementation, track this again to calculate the hours saved per week or month. This can be translated directly into a soft-cost saving.
- Time to Service Delivery: For new customers, measure the average time from “payment confirmed” to “service provisioned” or “welcome email sent.” Your goal is to drive this time as close to zero as possible.
Customer-Facing Metrics
While harder to isolate, a smooth post-payment process contributes to a better overall customer experience.
- Onboarding Satisfaction: If you survey new customers, include a question about the speed and clarity of the onboarding process. A faster, automated start can lead to higher initial satisfaction scores.
- Support Tickets Related to Billing: An effective payment recovery flow can reduce the number of customers who need to contact support for simple issues like updating a credit card. Track the volume of billing-related support tickets over time.
A Note on Data Security and Governance
Connecting systems that handle sensitive customer and financial data requires a security-first mindset. While the goal is automation, it must not come at the expense of privacy or security.
Principle of Least Privilege: When creating API keys for the integration in both Stripe and HubSpot, grant them only the specific permissions required to perform their tasks. For example, the key for HubSpot doesn’t need permission to delete all contacts; it may only need to read and update them. Avoid using super-admin keys for integrations.
Data Minimization: Be intentional about the data you sync. Does your sales team really need to see the last four digits of a customer’s credit card in HubSpot? Almost certainly not. Only sync the fields that are necessary for your teams to do their jobs. Avoid replicating sensitive financial data where it isn’t absolutely required.
Secure Your Endpoints: If you are building a custom integration using webhooks, ensure your receiving endpoint is secure. It must use HTTPS, and you must validate Stripe’s webhook signatures on every incoming request to prevent fraudulent requests.
Human in the Loop: Not every action should be fully automated. For high-stakes events, use automation to assist, not replace, human judgment. For instance, an automated workflow for a major enterprise client’s failed payment should not automatically cancel their subscription. Instead, it should create a high-priority task for their account manager, providing all the context needed for a personal follow-up.
Your Next Steps
Moving from concept to a live integration requires a clear, focused plan. Don’t try to boil the ocean. Instead, take an iterative approach to build momentum and deliver value quickly.
- Audit Your Current Process: The first step is to thoroughly document your existing, manual workflow. What happens today when a payment succeeds or fails? Who is involved? Where are the delays and potential points of failure? This map will reveal the most urgent pain points.
- Identify One High-Impact Workflow: Choose a single process to automate first. The best candidates are either high-frequency (happens many times a day) or high-pain (causes significant delays or frustration). For many businesses, automating the “New Customer Welcome” sequence is an ideal starting point as it is both common and critical to the customer experience.
- Choose Your Integration Method: Based on your team’s technical skills and the complexity of your chosen workflow, decide on the right tool. If it’s a simple data sync, a native connector might suffice. If it’s a multi-step process, middleware or a custom webhook approach may be necessary.
- Plan, Build, and Test: Use the best practices checklist to create a project plan. Start with a solid data map, build in a test environment, and test every possible scenario before going live. A deliberate, well-tested implementation is far better than a rushed one.
By taking these measured steps, you can build a powerful, scalable connection between your financial and customer data, creating a more efficient and responsive business.
Related Posts
Get a FREE
Proof of Concept
& Consultation
No Cost, No Commitment!