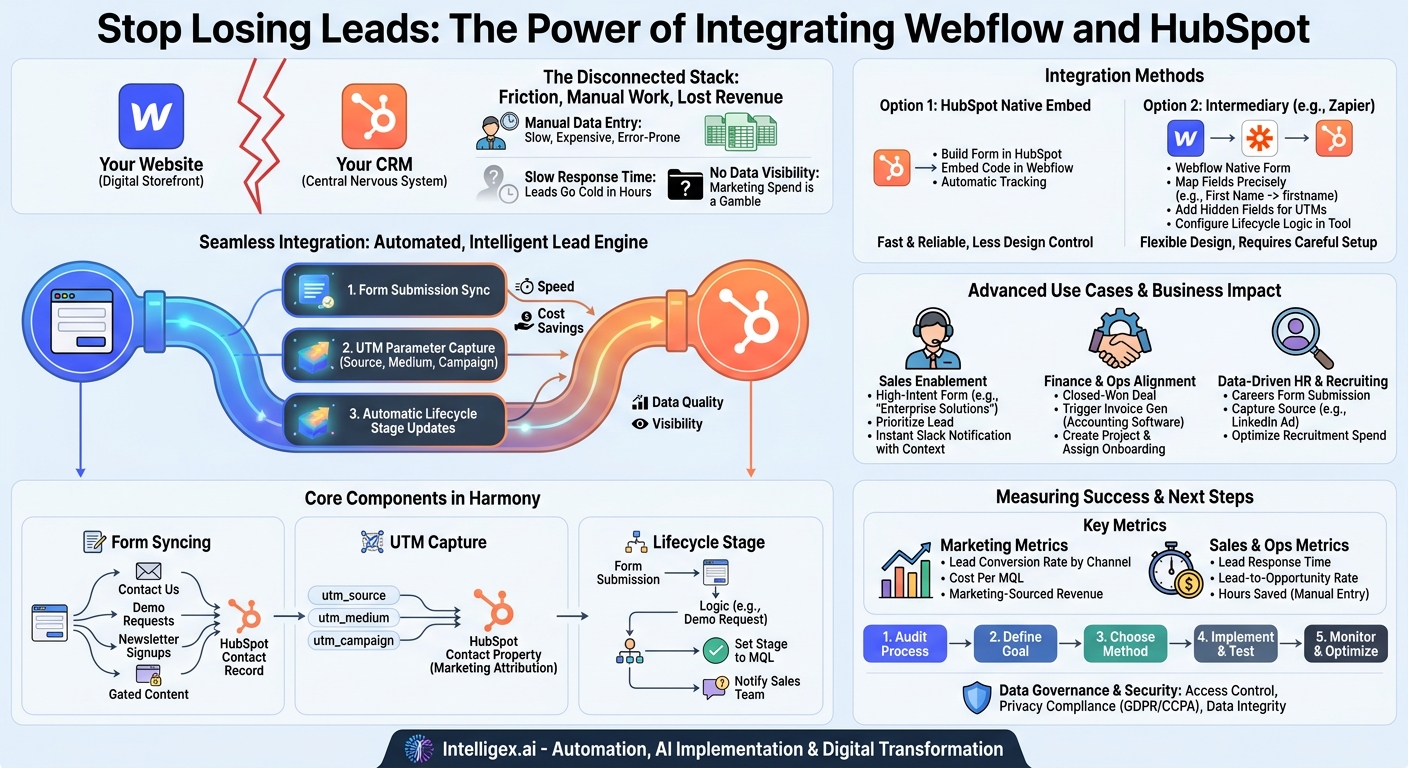
Your website is your digital storefront, and your CRM is your central nervous system. When these two systems don’t talk to each other, you create friction that costs you time, money, and opportunities. For many businesses, the combination of a visually stunning Webflow website and a powerful HubSpot CRM represents the ideal marketing and sales stack. The problem is that without a proper integration, you’re operating with two powerful tools that are functionally disconnected. Leads submit forms on your beautiful site, but the data sits in a silo, waiting for manual export. This delay is where revenue is lost.
A seamless integration between Webflow and HubSpot bridges this critical gap. It transforms your website from a passive brochure into an active, intelligent lead generation engine that feeds directly into your sales process. This isn’t just a technical convenience. It’s a strategic imperative that directly impacts business value across four key areas: speed, cost, data quality, and visibility. By automating the flow of information, you can get leads to your sales team in seconds, not hours, while providing them with the rich contextual data they need to have meaningful conversations.
Why a Disconnected Martech Stack is Costing You More Than You Think
The manual process of transferring leads from a website to a CRM might seem like a minor administrative task, but its hidden costs accumulate quickly and stifle growth. Relying on manual CSV exports and imports is not just inefficient; it’s a direct inhibitor to scalability and profitability.
First, consider the direct operational cost. Every hour an employee spends manually downloading submissions from Webflow, cleaning up spreadsheets, and importing them into HubSpot is an hour they could have spent on higher-value activities like campaign analysis or lead nurturing. This manual labor is expensive, prone to human error like typos or missed records, and simply cannot keep pace as your lead volume grows. If your marketing campaigns are successful and lead volume doubles, your manual process breaks. You are forced to either hire more staff for data entry or accept that leads will be lost or delayed.
The speed of lead follow-up is another critical factor. Studies consistently show that the odds of converting a lead decrease dramatically within the first hour. A manual process that runs once a day introduces a delay of up to 24 hours. In that time, your prospect has moved on, engaged with a competitor, or lost the initial intent that prompted them to reach out. Automation ensures that a lead who requests a demo at 2:00 PM is in a sales representative’s queue by 2:01 PM, maximizing the chances of a successful connection.
Finally, manual data transfer almost always results in a loss of data quality and visibility. A CSV file typically only contains the basic information a user entered into the form fields, like name, email, and company. It misses the crucial context: Where did this lead come from? Was it a high-intent Google Ad, a specific social media campaign, or an organic search? Without this marketing attribution data, you cannot know which channels are truly driving valuable leads, making it impossible to optimize your marketing spend effectively. Your entire customer journey becomes a black box, and your sales team is left flying blind, treating every lead as equal when they are not.
The Core Components of a Webflow-HubSpot Integration
A robust integration is more than just a pipe for contact information. It’s about transferring a complete data profile that empowers your marketing and sales teams. A successful setup focuses on three essential components working in harmony: form syncing, UTM parameter capture, and automatic lifecycle stage updates.
1. Form Submission Syncing
This is the foundational element. At its core, the integration ensures that whenever a visitor submits a form on your Webflow site, that data is instantly sent to HubSpot to either create a new contact or update an existing one. This applies to every form across your site, including:
- Contact Us: General inquiries that need to be routed to the right department.
- Demo or Quote Requests: High-intent submissions that should be sent to sales immediately.
- Newsletter Signups: Top-of-funnel contacts to be added to marketing nurture campaigns.
- Gated Content Downloads: Leads showing interest in a specific topic, like an eBook or whitepaper.
Automating this process eliminates manual entry, ensures no lead is ever dropped, and serves as the trigger for all subsequent marketing and sales actions.
2. Capturing UTM Parameters
UTM (Urchin Tracking Module) parameters are tags you add to a URL to track the effectiveness of online marketing campaigns. They tell you the source, medium, and campaign name that referred a visitor to your site. Capturing these is non-negotiable for any data-driven marketing team.
A proper integration captures these UTMs and stores them in corresponding properties on the HubSpot contact record. When a sales rep looks at a new lead, they won’t just see a name and email. They will see that the lead came from the “linkedin_spring_promo” campaign, giving them immediate context for a more relevant conversation. For marketing leaders, this data, aggregated over time, provides clear visibility into campaign ROI.
3. Setting Lifecycle Stages Automatically
Not all leads are created equal. HubSpot’s Lifecycle Stage property helps you classify contacts based on where they are in your funnel (e.g., Subscriber, Lead, Marketing Qualified Lead, Sales Qualified Lead, Customer). Your integration should use the context of the form submission to set this stage automatically.
For example, a “Newsletter Signup” form submission might set the lifecycle stage to “Subscriber.” In contrast, a “Request a Demo” form is a much stronger buying signal and should automatically set the stage to “Marketing Qualified Lead” (MQL), triggering a notification to the sales team. This automation pre-qualifies and segments your leads, ensuring that sales focuses its attention on the contacts most ready to engage.
Step-by-Step Guide: Native Integration vs. Third-Party Connectors
There are two primary paths for connecting Webflow forms to HubSpot. The first uses HubSpot’s own tools for a simple and direct connection. The second uses Webflow’s native forms and an intermediary tool for greater design flexibility and control. The right choice depends on your team’s technical skills and design requirements.
Option 1: Using HubSpot’s Native Form Embed
This is the most straightforward method. You build the form inside HubSpot and then embed it into your Webflow site. HubSpot handles all the heavy lifting of data capture, cookie tracking, and UTM attribution automatically.
- Create the Form in HubSpot: Navigate to Marketing > Lead Capture > Forms in your HubSpot portal. Use the form builder to create your form, adding all the necessary fields (e.g., First Name, Email, Message). HubSpot will automatically include hidden fields to capture tracking data.
- Copy the Embed Code: Once you’ve saved and published your form, HubSpot will provide you with an embed code. This is a small snippet of JavaScript. Copy this code to your clipboard.
- Add an Embed Element in Webflow: Open your Webflow project and navigate to the page where you want the form to appear. From the “Add Elements” panel, drag an “Embed” element onto your page.
- Paste the HubSpot Code: Paste the code you copied from HubSpot into the HTML embed code editor that appears. Save and close.
- Publish and Test: Publish your Webflow site. Submit a test entry on the live page (using a URL with test UTM parameters) and verify that the contact appears in HubSpot with all the correct information and properties.
This method is fast and reliable. However, the trade-off is often design control. Styling an embedded HubSpot form to perfectly match your Webflow site’s aesthetic can be challenging and may require custom CSS, which adds a layer of complexity.
Option 2: Connecting Webflow Forms via an Intermediary (The Robust Method)
This approach allows you to use Webflow’s highly flexible and powerful native form builder, giving you complete design control. The form submission data is then sent to HubSpot through Webflow’s Logic feature or a third-party automation tool like Zapier.
This method requires more careful setup but offers superior flexibility. Here is a checklist of critical considerations:
- Exact Field Mapping: This is the most common point of failure. Each field in your Webflow form must be mapped to the correct internal property name in HubSpot. For example, your “First Name” field in Webflow must map to the `firstname` property in HubSpot. Double-check these names carefully.
- Hidden Fields for UTMs: To capture marketing attribution data, you must add hidden fields to your Webflow form for each UTM parameter you want to track (e.g., `utm_source`, `utm_medium`, `utm_campaign`). You will typically need a small piece of JavaScript on your site to pull these parameters from the page URL and populate the value of these hidden fields when the page loads.
- Lifecycle Stage Logic: The logic to set the lifecycle stage is configured within your intermediary tool. For example, in a Zapier workflow (a “Zap”), you would set up a rule: “When a submission is received from Webflow Form X, create or update a HubSpot contact and set their Lifecycle Stage property to ‘MQL’.”
- Error Handling and Notifications: What happens if the connection to HubSpot fails for a moment? Your automation tool should have a plan for retrying the submission or, at a minimum, sending you a notification so you can investigate and avoid losing the lead.
Beyond the Basics: Advanced Use Cases and Business Impact
Once the basic integration is in place, you can unlock powerful, cross-departmental automation that drives significant business value. This is where you move from simple efficiency gains to true digital transformation.
Scenario 1: Sales Team Enablement and Prioritization
Imagine a lead visits your “Enterprise Solutions” page and fills out a “Request Pricing” form. The integration doesn’t just create a contact; it does so much more. A hidden field on the form captures the page name (“Enterprise Solutions”). When the data hits HubSpot, an automated workflow is triggered. It checks the value of this field, sets the lead’s priority to “High,” and instantly assigns them to a sales rep on the enterprise team. The rep receives a Slack notification with the lead’s name, company, and the specific solution they are interested in, all within seconds. This process transforms a generic lead into a high-priority, context-rich opportunity, dramatically reducing response time and improving the quality of the first sales conversation.
Scenario 2: Finance and Operations Alignment
When a lead becomes a customer, the handoff from Sales to Finance and Operations needs to be seamless. Let’s say a sales rep closes a deal in HubSpot, changing the contact’s lifecycle stage to “Customer.” This status change can trigger a new workflow. The integration can automatically send the customer’s details (name, company, service level purchased) from HubSpot to your accounting software to generate the first invoice. Simultaneously, it could create a new project in your project management tool and assign an onboarding specialist. This eliminates manual setup for new clients, reduces the risk of billing errors, and accelerates the time-to-revenue.
Scenario 3: Data-Driven HR and Recruiting
This same integration framework can be applied to your recruiting efforts. A job candidate applies through a form on your Webflow “Careers” page. The form submission creates a contact record in HubSpot, which can be used as a lightweight Applicant Tracking System (ATS). Most importantly, the UTM data is captured. The HR team can now see that the best candidates for engineering roles are coming from a specific LinkedIn ad campaign, while the best marketing candidates are coming from an industry job board. This provides clear ROI on recruitment ad spend and allows the team to focus its budget on the most effective channels.
What to Measure: Key Metrics for Success
The goal of this integration is to produce tangible business results. To prove its value, you must track the right metrics. Don’t just focus on the number of submissions; measure the impact on the entire revenue funnel.
Marketing Metrics
- Lead Conversion Rate by Channel: With accurate UTM tracking, you can finally see which channels (e.g., Organic Search, Paid Social, Email) are not just driving traffic, but converting visitors into leads.
- Cost Per MQL: Move beyond measuring the cost per click or per lead. By automatically identifying MQLs based on form submissions, you can calculate the true cost of acquiring a sales-ready lead from each campaign.
- Marketing-Sourced Revenue: The ultimate goal. By connecting the initial lead source data to closed-won deals in HubSpot, you can directly attribute revenue to the marketing campaigns that generated it.
Sales and Operational Metrics
- Lead Response Time: This should be one of the first metrics to improve. Measure the time from form submission to the first contact attempt by a sales rep. Automation should reduce this from hours or days to minutes.
- Lead-to-Opportunity Conversion Rate: As sales reps receive higher-quality, context-rich leads more quickly, their ability to convert those leads into qualified sales opportunities should increase.
- Hours Saved on Manual Data Entry: Quantify the operational efficiency. Estimate the time your team previously spent on manual data transfer and calculate the cost savings based on their hourly rate.
A Note on Data Governance and Security
As you connect these systems and automate the flow of personal data, maintaining strong governance and security practices is essential. You are handling information that belongs to your prospects and customers, and it is your responsibility to protect it.
First, practice the principle of least privilege with access control. Not everyone on your team needs to see or edit every piece of contact data. Use HubSpot’s permission sets to ensure that team members can only access the information necessary for their roles. For instance, a content marketer may only need to see aggregate data, while a sales director needs access to specific deal information.
Second, ensure compliance with data privacy regulations like GDPR and CCPA. Your website forms must include clear language about what the user is signing up for, along with a link to your privacy policy. You must obtain explicit consent before adding a contact to a marketing email list. This integration makes it easy to manage consent by mapping a checkbox on your form directly to the subscription properties in HubSpot.
Finally, do not treat this integration as a “set it and forget it” project. You must maintain data integrity. A small change to a form field name in Webflow without updating the mapping in your integration tool can break the entire data flow. Implement a process for managing changes and periodically audit the data flowing into HubSpot to check for errors, inconsistencies, or missing fields. Regular checks ensure the data your teams rely on remains accurate and trustworthy.
Your Next Steps: Building a Connected System
Moving from a disconnected stack to a seamlessly integrated system is a manageable process when broken down into clear steps. Instead of trying to boil the ocean, start with a focused plan to solve your most pressing problem first.
- Audit Your Current Process: Before you build anything, map out your existing workflow. Follow a lead from the moment they land on your website to the first contact from sales. Identify every manual step, every point of delay, and every data gap. This will highlight the biggest opportunities for improvement.
- Define Your Primary Goal: What is the most critical issue to solve? Is it the slow lead response time hurting sales conversions? Or is it the lack of marketing attribution data making it impossible to justify your ad spend? Pick one primary objective to guide your initial integration build.
- Choose Your Integration Method: Based on your audit and goals, decide on the best technical approach. If speed and simplicity are paramount and you are comfortable with HubSpot’s form builder, the native embed is a great starting point. If complete design control and custom data handling are essential, plan for an API-based connection using a tool like Zapier or Webflow Logic.
- Implement and Test Rigorously: Build the integration in a controlled or staging environment if possible. Create a testing plan. Submit forms using a variety of scenarios and test UTM parameters. Verify in HubSpot that every piece of data, from the email address to the campaign source to the lifecycle stage, is appearing exactly as expected.
- Monitor, Measure, and Optimize: After launching, keep a close watch on the key metrics you identified. Share the results with stakeholders to demonstrate the value of the project. As your system proves reliable, look for new opportunities to build further automation, like lead scoring models or advanced nurture sequences, based on the rich, real-time data you are now collecting.
Related Posts
Get a FREE
Proof of Concept
& Consultation
No Cost, No Commitment!