
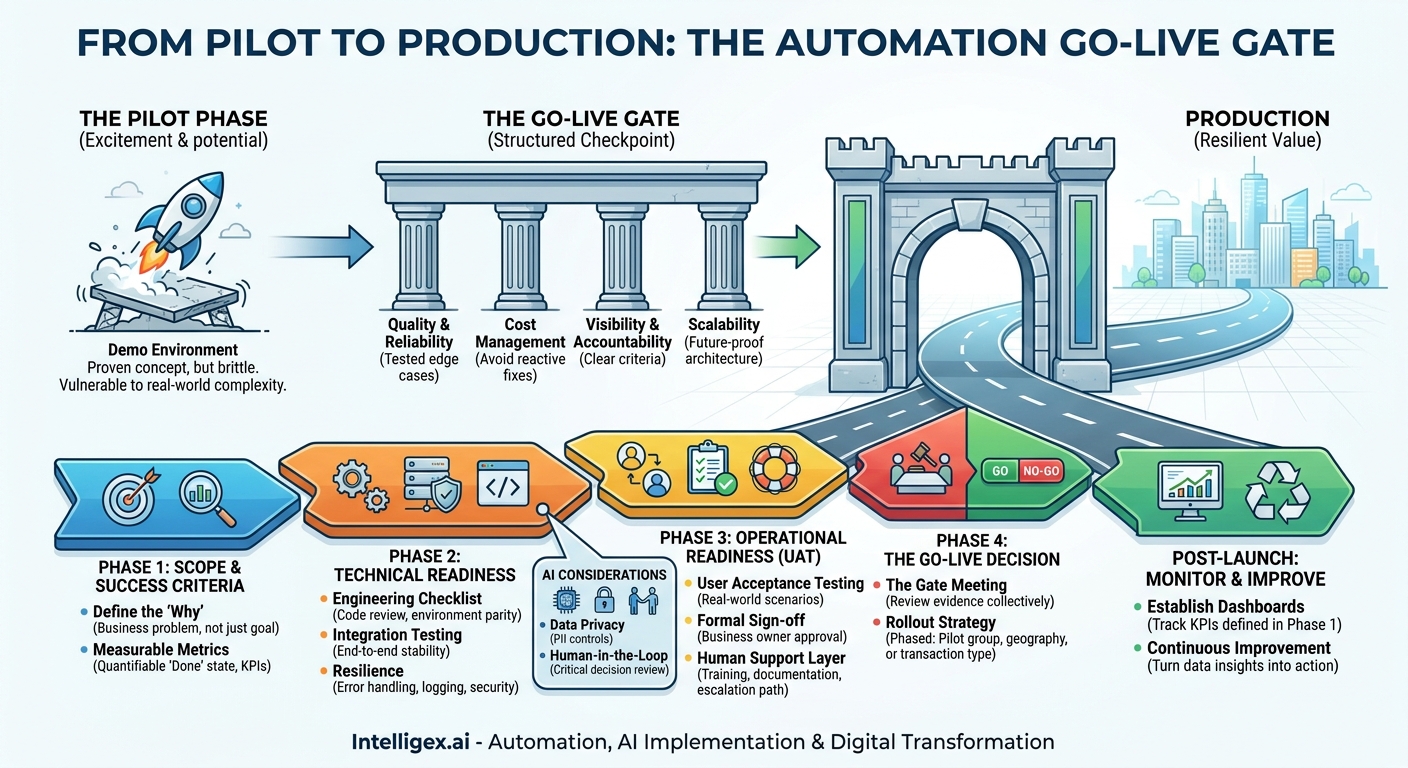
A successful automation pilot is an exciting milestone. Your team has proven that a manual, time-consuming process can be streamlined, unlocking new levels of efficiency. But the journey from a controlled pilot to a resilient, production-grade workflow is where many initiatives stumble. The path is littered with projects that worked perfectly in a demo but failed under the pressure of real-world complexity, data variations, and user demands. This is not a technical failing; it is a process failing.
Moving from pilot to production requires a deliberate, structured approach. It requires a go-live gate: a formal checkpoint where you verify that a new automated workflow is not just functional, but also robust, secure, and ready to deliver measurable business value. This isn’t about adding bureaucracy. It’s about mitigating risk and ensuring the resources you’ve invested translate into a reliable asset for your organization.
Why a Go-Live Gate is Non-Negotiable for Automation
Implementing a formal go-live gate process protects your investment and ensures that automation delivers on its promise. Rushing a workflow into production without proper vetting can lead to data corruption, operational disruptions, and a loss of confidence in automation itself. A structured gate process provides a clear framework for making a go/no-go decision based on evidence, not just enthusiasm.
The business value of this discipline is clear and impacts several key areas:
- Quality and Reliability: The most significant benefit is ensuring the automated workflow performs as expected. By systematically testing for edge cases, error handling, and performance under load, you prevent embarrassing and costly failures that can damage customer relationships or internal operations. For example, a bug in an automated invoicing workflow could result in thousands of incorrect bills being sent to customers, a nightmare for both finance and customer support.
- Cost and Resource Management: Fixing a broken workflow in a live production environment is exponentially more expensive than catching issues during a structured review. A go-live gate minimizes frantic, reactive firefighting. It ensures that technical resources can move on to the next high-value project instead of being pulled back to fix a deployment that was launched prematurely.
- Visibility and Accountability: A formal gate process makes the readiness of a project transparent to all stakeholders. Business leaders, IT teams, and end-users all understand the criteria for launch. This creates clear accountability. If a workflow is approved, everyone knows it has met a predefined standard of quality and operational preparedness.
- Scalability and Future-Proofing: A workflow that works for 10 transactions a day might collapse at 1,000. The go-live process validates that the solution is built on a scalable architecture. It also ensures proper documentation and support models are in place, making it easier to maintain, adapt, and improve the automation over time as business needs evolve.
Phase 1: Defining the Scope and Success Criteria
Before a single line of code is written or a workflow is configured, the foundation for a successful production deployment is laid. This initial phase is about achieving absolute clarity on what you are building, why you are building it, and how you will measure its success. Without this, your go-live gate has no meaningful criteria to evaluate against.
Start with the “Why”
First, define the business problem with precision. “We want to automate HR onboarding” is a goal, not a problem statement. A better starting point is: “Our current manual onboarding process takes an average of 8 hours of HR coordinator time per new hire and leads to frequent delays in provisioning system access, which impacts new hire productivity for their first three days.” This specific statement immediately points to the metrics that matter: HR coordinator hours saved and new hire time-to-productivity.
For every proposed automation, document the answers to these questions:
- What specific process are we automating? Define the start and end points clearly.
- What are the primary pain points of the current process? (e.g., slow, error-prone, inconsistent, not auditable).
- Which business teams and systems are involved? (e.g., HR, IT, Finance; involves Workday, Active Directory, and an ERP).
- Who is the executive sponsor and who is the day-to-day business owner?
Define “Done” with Measurable Metrics
Success criteria must be tangible and quantifiable. This moves the evaluation from a subjective “I think it’s working” to a data-driven “We have met the objectives.” Your go-live decision will ultimately hinge on whether these criteria have been met.
Consider these examples for different business functions:
- Finance (AP Invoice Processing):
- Current State: Average 7 days to process an invoice; 10% error rate requiring manual correction.
- Success Criteria: Reduce average processing time to 24 hours for 95% of standard invoices; reduce manual correction rate to less than 2%.
- Sales Operations (Lead Assignment):
- Current State: Leads assigned manually within 4 business hours; inconsistent routing rules.
- Success Criteria: Assign all inbound leads from the web form to the correct regional sales rep in under 5 minutes; maintain a routing error rate of less than 1%.
- Supply Chain (Purchase Order Creation):
- Current State: Manually creating POs from approved requisitions takes 15 minutes per PO.
- Success Criteria: Automatically generate and dispatch POs for all approved requisitions from top-tier suppliers within 2 minutes of approval.
These metrics are not just for the final go-live gate. They are the north star for the entire project, guiding design, development, and testing decisions along the way.
Phase 2: Technical Readiness and Integration Testing
With clear success criteria defined, the focus shifts to building and validating the technical solution. A workflow that is functionally correct but brittle, insecure, or unable to handle exceptions is a production incident waiting to happen. The technical readiness gate ensures the solution is sound from an engineering perspective.
The Technical Readiness Checklist
Before presenting a workflow for business user testing, the development and IT teams should be able to confidently check off these items. This checklist serves as a minimum standard for technical quality.
- Code and Configuration Review: Has the code or workflow configuration been peer-reviewed for quality, maintainability, and adherence to standards?
- Environment Parity: Have dedicated development, testing (staging), and production environments been established? The testing environment should mirror production as closely as possible in terms of data structure, system versions, and access permissions.
- Integration Testing: Has the workflow been tested end-to-end with all integrated systems? This includes CRMs like Salesforce, ERPs, and internal databases. Confirm that the connections are stable and that the workflow can handle API responses, both successful and unsuccessful.
- Error Handling and Resilience: What happens if a connected system is down or an API call fails? The workflow must have robust error handling. It should not simply crash. It should retry, log the error clearly, and, if necessary, notify a human operator through a defined channel (e.g., email, a ticket in an ITSM system like ServiceNow, a Slack message).
- Logging and Auditing: Is the workflow logging its key actions? In case of a dispute or an error, you must be able to trace exactly what happened, when it happened, and what data was involved. This is critical for debugging and for compliance.
- Security and Access Control: Have all credentials and API keys been secured (e.g., using a secrets manager) and not hard-coded? Does the workflow run with the minimum necessary permissions to perform its tasks (the principle of least privilege)? Has a security review been completed?
- Performance and Load Testing: Has the workflow been tested against a realistic volume of transactions? If it needs to process 1,000 items per hour at peak, testing with 10 items is not sufficient.
An Integration Example: Customer Onboarding
Imagine a workflow that onboards a new B2B customer. It might be triggered by a “Closed Won” opportunity in your CRM. The workflow needs to:
- Create a customer account in your financial ERP.
- Provision a project space in your project management tool.
- Create the primary user’s account in your product platform.
- Send a welcome email with login details.
Integration testing must verify that if step 1 (ERP account creation) fails, the entire process stops, logs the error, and notifies the account manager. It should not proceed to create a project space or a user account for a customer who doesn’t exist in the financial system. This prevents data inconsistency and a poor customer experience.
Phase 3: Operational Readiness and User Acceptance
A technically perfect automation can still fail if the business isn’t ready to adopt it. This phase is about preparing the people and the surrounding processes for the new reality. Operational readiness ensures that the workflow has a designated owner, a clear support path, and users who are trained and confident in its use.
User Acceptance Testing (UAT)
UAT is the most critical part of this phase. It is not developer testing. It is testing performed by the actual business users who will rely on the workflow. They bring the contextual knowledge that developers lack, and they are the ultimate arbiters of whether the solution truly solves their problem.
A successful UAT process involves:
- Test Scripts: Provide users with clear scenarios to test. Don’t just say “test the invoice workflow.” Give them scripts like, “Process a standard invoice under $5,000,” “Process an invoice that is missing a PO number,” and “Process an invoice in a foreign currency.” These scripts should cover both common “happy path” scenarios and known edge cases.
- Dedicated Test Environment: UAT must be conducted in the staging environment, which closely mirrors production. Using a development environment is not sufficient, as it may not have realistic data or permissions.
- Formal Sign-Off: The conclusion of UAT should be a formal sign-off from the business owner. This sign-off document confirms that the workflow meets the agreed-upon requirements and is ready for production from their perspective. It is a key artifact for the final go-live gate meeting.
Building the Human Support Layer
Automation doesn’t eliminate the need for people; it changes their role. They move from doing the repetitive work to managing the automated system. This requires a support structure.
Before go-live, you must have clear answers to these questions:
- Who is the business process owner? This person is the primary point of contact for any questions about the workflow’s logic and performance.
- What is the support escalation path? When a user encounters an issue, who do they contact first (Level 1 support, e.g., the help desk)? If the first level can’t resolve it, who is Level 2 (e.g., the business process owner or a power user)? Who is Level 3 (e.g., the development or IT team that built the automation)?
- Is there documentation? A simple Standard Operating Procedure (SOP) should be created. It should explain what the workflow does, how to handle common exceptions, and who to contact for support.
- Has training been completed? All affected users must be trained on the new process and how it impacts their daily work.
Phase 4: The Go-Live Decision and Rollout Strategy
This is the moment of truth: the final go-live gate meeting. It is a formal session where all stakeholders come together to review the evidence and make a collective, informed decision. The meeting should be chaired by the project manager or sponsor and must include the business owner, technical lead, and representatives from any impacted teams (like IT support).
The Go-Live Gate Meeting Agenda
A structured agenda ensures all critical areas are covered and the decision is based on facts.
- Review of Business Case and Success Criteria: Start by restating the original problem and the metrics for success. This re-grounds everyone in the project’s purpose.
- Presentation of Technical Readiness: The technical lead confirms that all items on the technical readiness checklist have been completed. They should briefly discuss the results of integration and performance testing.
- Presentation of UAT Results: The business owner presents the results of User Acceptance Testing. They should confirm that test scripts were completed successfully and present the formal UAT sign-off document. Any issues discovered during UAT and their resolutions should be discussed.
- Confirmation of Operational Readiness: Review the support plan, documentation, and training completion. Confirm that everyone knows who to call if something goes wrong.
- Review of Rollout Plan: Discuss the specific plan for deployment. This includes the date, time, and team responsible for the deployment. It also covers the rollback plan. What is the trigger for a rollback, and what are the exact steps to revert to the previous manual process if a critical failure occurs?
- The Go/No-Go Decision: With all the evidence presented, the project sponsor formally asks the stakeholders, particularly the business owner and technical lead, for their final go or no-go recommendation. The decision must be documented.
Choosing Your Rollout Strategy
A “big bang” approach, where you switch everyone over at once, is often the riskiest. Consider a phased rollout to de-risk the launch:
- Pilot Group: Roll out the workflow to a small, select group of power users first. They can provide final feedback in a live environment before a wider release.
- By Geography or Department: For a large organization, you could roll out the automation to one office or one business unit at a time. This contains the potential impact of any unforeseen issues.
- By Transaction Type: You could automate one specific type of transaction first. For example, in accounts payable, you might start by only automating invoices from your top 10 highest-volume vendors before expanding to others.
Special Considerations for AI-Powered Workflows
When your automated workflow incorporates Artificial Intelligence, such as natural language processing for reading documents or a machine learning model for making predictions, the go-live gate requires additional layers of scrutiny. AI introduces a level of non-determinism that traditional, rules-based automation does not have.
Data Privacy and Security
AI models are trained on data. If that data includes sensitive customer or employee information (personally identifiable information or PII), you must have stringent controls. Before going live, verify that the system complies with regulations like GDPR or CCPA. Access to the data and the model’s outputs must be tightly controlled on a need-to-know basis.
The Human-in-the-Loop
For high-stakes decisions, it is rarely advisable to let an AI operate with full autonomy from day one. Implement a “human-in-the-loop” (HITL) review process. This means that while the AI can recommend a decision, a human must provide the final approval.
Good candidates for HITL review include:
- Financial Transactions: An AI can extract data from an invoice and match it to a PO, but a human should provide final approval for payments over a certain threshold.
- Customer Communications: An AI can draft a response to a customer query, but a support agent should review and approve it before it is sent, especially if the query is complex or sensitive.
- Data Classification: An AI can suggest classifying a document as “confidential,” but a human should confirm before access controls are automatically applied.
Your go-live plan for an AI workflow should include criteria for gradually increasing autonomy as you build confidence in the model’s performance in the production environment.
Post-Launch: Monitoring and Continuous Improvement
The work is not finished when the workflow goes live. Production is where the real learning begins. A critical component of a mature automation program is robust monitoring and a commitment to continuous improvement.
Establish a Monitoring Dashboard
You cannot manage what you do not measure. A dashboard, visible to both business and technical owners, should track the key performance indicators (KPIs) you defined back in Phase 1. This dashboard should provide at-a-glance answers to questions like:
- How many transactions is the workflow processing per hour/day?
- What is the average processing time per transaction?
- What is the error or exception rate?
- What are the most common reasons for exceptions?
Cloud platforms like Amazon Web Services provide extensive tools for monitoring the performance and health of your underlying infrastructure and applications.
From Data to Insights to Action
This data is the foundation for a continuous improvement cycle. Schedule regular (e.g., monthly) reviews with the business process owner to analyze the dashboard. If you see that 20% of workflows are failing because of a specific data format issue from one particular vendor, that’s an actionable insight. You can then work with that vendor to fix the data source or enhance the workflow to handle that specific variation.
This approach turns your automation from a static, one-time project into a dynamic asset that evolves and delivers increasing value over time.
Your Next Steps to Production-Ready Automation
Moving from a clever pilot to a trusted, production-scale automated workflow is a journey of discipline. It requires treating automation with the same rigor as any other critical software deployment. By implementing a go-live gate process, you replace hope with evidence, ensuring that every workflow you launch is ready to deliver real, measurable, and reliable value to the business.
To get started, you don’t need a complex, bureaucratic process. Begin with these simple steps for your next automation project:
- Formalize Your Success Criteria: Before you start building, write down the specific, measurable outcomes you expect. Get your business sponsor to agree to them.
- Create a Simple Checklist: Adapt the technical and operational readiness checklists from this post. A one-page checklist is better than none at all.
- Schedule the Gate Meeting: Put the final go-live gate meeting on the calendar from the beginning of the project. This signals its importance and ensures everyone is working toward a clear decision point.
By taking these deliberate steps, you will increase the quality and resilience of your automations, build trust with your business stakeholders, and create a solid foundation for scaling your digital transformation initiatives.
Your Next Read:
Category:
Get a FREE
Proof of Concept
& Consultation
No Cost, No Commitment!