The culmination of a system migration project is a moment of both high tension and immense potential. Months, sometimes years, of planning, development, and testing all lead up to a single, critical event: the cutover. This is the precise moment when the old system is retired, and the new one officially takes its place. It’s the point of no return. A seamless cutover is celebrated as a major success, validating all the hard work that came before it. A chaotic one, however, can lead to significant business disruption, data loss, and a catastrophic blow to project ROI and team morale. The difference between these two outcomes often hinges on one crucial document: a detailed, comprehensive, and well-rehearsed cutover checklist.
This checklist is far more than a simple to-do list. It’s a meticulously crafted script for the go-live event, a strategic blueprint that orchestrates every task, every person, and every minute of the transition. It transforms a potentially frantic and unpredictable process into a controlled, step-by-step procedure, ensuring that nothing is forgotten and that everyone involved knows their exact role. In the high-stakes world of system migration, your cutover checklist is your single most important tool for mitigating risk and guaranteeing a smooth launch.
What Exactly is a System Cutover?
At its core, a system cutover is the process of transitioning from a legacy system to a new one. This isn’t just about “flipping a switch.” It’s a complex sequence of activities that must be executed in a precise order within a defined timeframe, often referred to as the “cutover window.” This window, typically scheduled during off-peak hours like a weekend or overnight, is a period of planned downtime where the magic happens.
Activities during this window include:
- Performing the final, full backup of the legacy system.
- Executing the final data migration to sync any data that has changed since the last major data load.
- Performing critical data validation and integrity checks.
- Reconfiguring network devices like firewalls and load balancers to point to the new system.
- Conducting a final round of “smoke tests” to ensure core functionality is working.
- Granting users access to the new system.
- Formally decommissioning or archiving the old system.
The strategy for the cutover can vary. A “Big Bang” cutover switches everyone and everything over at once—a high-risk, high-reward approach. A “Phased” cutover migrates users or business units in stages, lowering the risk but extending the transition period. A “Parallel” cutover runs both the old and new systems simultaneously for a time, which is the safest but also the most resource-intensive method. Regardless of the strategy you choose, a detailed checklist is non-negotiable for managing the complexity of the transition.
The High Cost of Improvisation
Attempting a system cutover without a granular checklist is like trying to assemble a 10,000-piece puzzle in the dark without the picture on the box. The potential for failure is immense, and the consequences can be severe. When you “wing it,” you open the door to a host of preventable disasters that can derail the entire project.
Consider the risks of an unplanned cutover:
- Extended and Unplanned Downtime: A missed dependency or a failed script can halt the entire process. Without a plan, teams scramble to troubleshoot, burning through the cutover window. Every minute of extra downtime can translate to lost revenue, decreased productivity, and customer dissatisfaction.
- Data Corruption or Loss: This is the ultimate nightmare scenario. Forgetting a crucial data validation step or running migration scripts in the wrong order can lead to irreversible data damage, compromising the integrity of your most valuable asset.
- Failed Integrations: Modern systems rarely live in a vacuum. A cutover involves re-establishing connections to countless other applications. Forgetting to update a single API endpoint or firewall rule can cause a cascade of failures across your entire enterprise architecture.
- Confusion and Inefficiency: During the high-pressure cutover window, clarity is paramount. Without a checklist assigning specific owners to each task, people may not know what they are responsible for, leading to critical steps being missed or duplicated efforts wasting valuable time.
- A Botched Rollback: Sometimes, despite the best planning, a cutover must be aborted. A good checklist includes a detailed rollback plan. Without one, the attempt to revert to the old system can be even more chaotic and damaging than the failed cutover itself.
The Anatomy of a Bulletproof Cutover Checklist
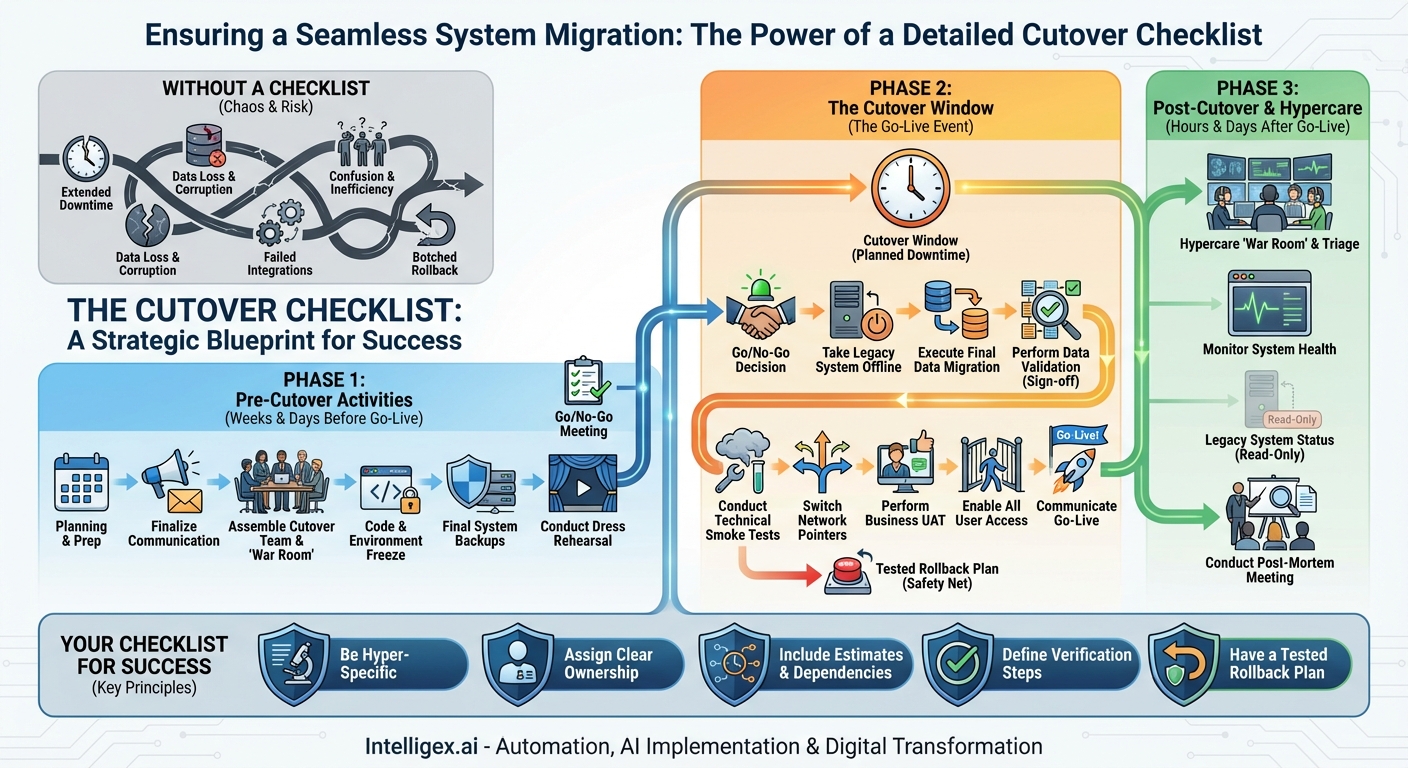
A truly effective cutover checklist is not a single document but a comprehensive plan broken down into distinct phases. It should be granular, time-bound, and clear, leaving no room for ambiguity. Here’s a breakdown of what it should contain, structured by phase.
Phase 1: Pre-Cutover Activities (Weeks & Days Before Go-Live)
This phase is all about preparation. The goal is to set the stage for a smooth transition, ensuring all prerequisites are met and the team is fully aligned before the cutover window even begins.
- Finalize the Communication Plan: Draft all stakeholder communications, including downtime notifications for end-users, status update templates for leadership, and go-live announcements. Confirm the distribution lists and schedule the sends.
- Assemble and Brief the Cutover Team: Identify every individual involved in the cutover. This includes the project manager, technical leads, database administrators, network engineers, business analysts, and key business users for testing. Create a master contact sheet and establish a “war room” communication channel (e.g., a dedicated Microsoft Teams or Slack channel and a persistent conference bridge).
- Implement a Code and Environment Freeze: Declare a firm freeze on any changes to the production environment for both the legacy and new systems. This prevents last-minute changes from introducing unexpected variables.
- Perform Final System Backups: Schedule and execute a full, verified backup of the legacy system’s database and application servers. This is your ultimate safety net.
- Conduct a Dress Rehearsal: Execute a full dry run of the cutover plan in a pre-production environment that mirrors production as closely as possible. This is the single best way to identify gaps, incorrect time estimates, and flawed procedures in your plan.
- Schedule the Go/No-Go Meeting: Book the final decision-making meeting for a few hours before the cutover window officially opens. Define the specific criteria (e.g., “All priority 1 test cases passed,” “Legacy system backup verified”) that must be met to receive the “Go” decision.
Phase 2: The Cutover Window (The Go-Live Event)
This is the main event. The checklist for this phase should be a minute-by-minute script of actions, with each item having a task description, an owner, an estimated duration, a start time, and a column to mark completion and verification.
- Go/No-Go Decision: The project sponsor and key stakeholders meet to give the final green light.
- Communicate Downtime Start: Send the pre-drafted notification that the planned outage is beginning.
- Take Legacy System Offline: Disable user access to the old system. This is crucial to prevent data changes during the final migration.
- Execute Final Data Migration: Run the scripts to migrate any transactional data created since the last major data load (the “delta” migration).
- Perform Data Validation: The technical team runs verification scripts to check for record counts and data integrity. Business users then perform spot checks on critical data to confirm accuracy. This step requires a formal sign-off.
- Apply Final Configurations: Make any last-minute configuration changes to the new system (e.g., enabling integrations, setting up user permissions).
- Conduct Technical Smoke Tests: The core technical team performs a series of pre-defined tests to ensure the system is operational (e.g., successful login, core screen loads, basic search functionality).
- Switch Network Pointers: The network team updates DNS records, load balancers, and firewall rules to direct all traffic from the old system’s address to the new one.
- Perform Business UAT: A pre-selected group of power users runs through a script of critical business processes to provide a final layer of validation in the live environment.
- Enable All User Access: Open the floodgates. Make the new system accessible to the entire user base.
- Communicate Go-Live: Send the official “Welcome to the new system!” announcement.
Phase 3: Post-Cutover & Hypercare (Hours & Days After Go-Live)
The work isn’t over when the system is live. This phase is about stabilization, support, and ensuring a smooth transition to business-as-usual.
- Establish a Hypercare “War Room”: Keep the core project team on high alert and immediately available to triage and resolve issues as they are reported by users. This intensive support period usually lasts from a few days to two weeks.
- Monitor System Health: Closely watch server performance (CPU, memory, disk I/O), application error logs, and integration health to proactively identify and address problems.
- Conduct Post-Mortem Meeting: Once the hypercare period ends, gather the project team to review the cutover process. Document what went well, what went wrong, and the lessons learned to improve future projects.
– Legacy System Status: Keep the legacy system available in a read-only mode for a pre-determined period (e.g., 30 days). This provides a quick reference for data validation and acts as a fallback if a critical issue is discovered post-launch. Do not decommission it immediately.
Your Checklist for Success
A great checklist is more than just a list of tasks; it’s a living document built on a foundation of best practices.
- Be Hyper-Specific: Avoid vague tasks like “Validate data.” Instead, write “Run `sp_CustomerCount_Validation` script and compare results against legacy report X. Owner: DBA_Team.”
- Assign Clear Ownership: Every single line item must have a named individual or specific team responsible for its execution. Ambiguity is the enemy.
- Include Time Estimates and Dependencies: Each task needs a realistic duration. This allows you to build a reliable timeline and understand the downstream impact if one task is delayed.
- Define Verification Steps: Don’t just check a task off. How do you know it was successful? Add a column for “Verification Method” to ensure every step is confirmed complete.
- Have a Tested Rollback Plan: What are the exact steps and who are the owners to revert to the old system if a critical failure occurs? This plan must be documented and tested during the dress rehearsal. Hope is not a strategy.
A system migration is one of the most complex and high-risk initiatives a company can undertake. Its success is ultimately judged by the final, pivotal act of the cutover. By investing the time and effort to create a detailed, granular, and well-rehearsed cutover checklist, you transform a moment of high anxiety into a demonstration of control and professionalism. It is the definitive tool that empowers your team to navigate complexity, mitigate risk, and deliver the seamless transition your business expects and deserves.
Your Next Read:
Category:
Get a FREE
Proof of Concept
& Consultation
No Cost, No Commitment!