A critical customer ticket sits in the queue, its deadline ticking away. Your support team is handling a flood of other requests, and no one has noticed this one is about to breach its Service Level Agreement (SLA). The notification email is lost in a crowded inbox. By the time someone realizes, it’s too late. The customer is frustrated, trust is damaged, and your team is left scrambling.
This scenario is all too common, but it is not inevitable. It is a process problem, born from manual workflows that rely on individuals to spot and act on every critical signal. The solution lies in creating an automated, proactive system that surfaces risks before they become crises. By integrating your help desk with your team’s communication hub, you can build a powerful defense against SLA breaches. Connecting Zendesk and Slack allows you to automatically escalate tickets that are at risk, turning a blind spot into a high-visibility action item.
Why Manual Escalation Fails (And What It Costs You)
Relying on agents to manually monitor queues and escalate at-risk tickets is an inherently fragile process. Even with the best team, this approach is prone to failure for several reasons. First is simple human oversight. When agents are managing dozens of tickets, it’s easy to miss the single one that needs immediate attention. Second is the communication delay. An agent might spot a problem, but finding the right team lead or subject matter expert, explaining the context, and getting them to act takes precious time that you don’t have.
This creates a critical visibility gap. Managers and senior leaders often have no line of sight into potential SLA breaches until after they happen, when they are already in damage control mode. The consequences of these failures are not trivial. They translate directly into business costs:
- Customer Churn: Consistently failing to meet promised service levels erodes customer trust and drives them to competitors.
– Contractual Penalties: For B2B companies, SLA breaches can trigger financial penalties, service credits, or even contract termination clauses.
– Reputation Damage: Poor service experiences quickly spread through word-of-mouth and online reviews, impacting your brand and future sales.
– Team Burnout: Constant firefighting and dealing with angry customers is stressful and demoralizing for your support staff, leading to higher employee turnover.
Automating the escalation process removes the burden of constant vigilance from your team, freeing them to focus on resolving issues rather than just monitoring queues. It replaces a reactive, manual workflow with a proactive, reliable system.
The Zendesk and Slack Connection: A Proactive Defense for Your SLAs
The core of this solution is simple: use the data inside Zendesk to trigger real-time, actionable alerts in Slack. Instead of waiting for a human to notice a problem, the system itself flags the risk and delivers it directly to the people who can solve it. This connection transforms your SLA management from a passive, hope-based strategy into an active, automated defense.
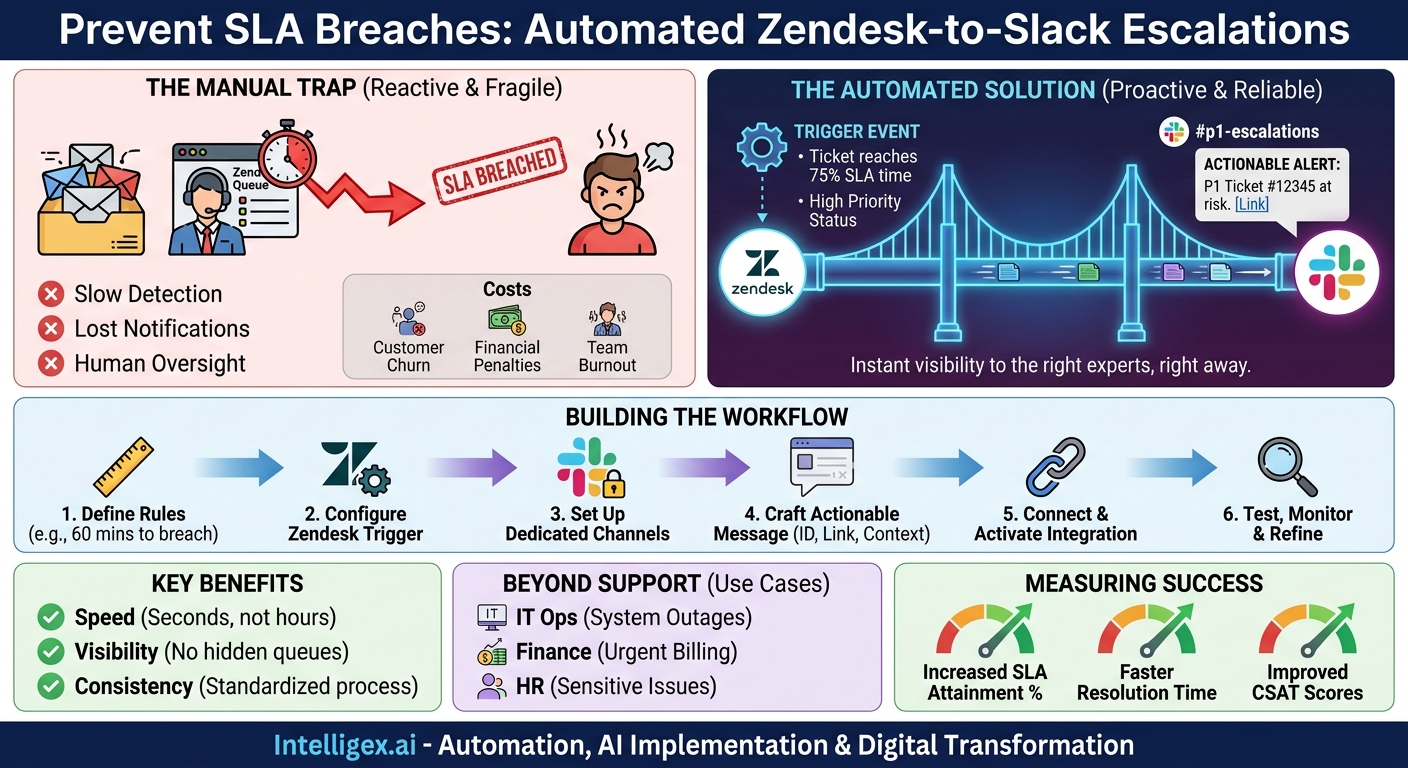
At a high level, the workflow is straightforward. An event in Zendesk, such as a ticket reaching 75% of its allotted SLA time, acts as a trigger. This trigger sends a carefully crafted message to a designated Slack channel. This isn’t just a generic notification. It’s a rich alert containing all the context needed for immediate action: the ticket ID, customer name, a summary of the issue, and a direct link to the ticket in Zendesk. The right people see the right information at the right time, in the place where they already work.
The business value is clear and measurable across several key areas:
- Speed: Escalations happen in seconds, not minutes or hours. The time between a ticket becoming at-risk and an expert being notified is virtually eliminated.
- Visibility: Critical issues are no longer hidden in a queue. They are surfaced in a high-visibility Slack channel, ensuring that team leads, managers, and stakeholders are aware of problems as they develop.
- Quality and Consistency: Automation ensures the escalation process is followed every single time. No ticket is forgotten, and every alert follows a standard format, eliminating confusion.
- Scalability: As your ticket volume grows, a manual process breaks down. An automated system scales effortlessly, handling ten or ten thousand tickets with the same reliability.
Building Your First Automated Escalation Workflow: A Step-by-Step Guide
Creating your first automated escalation workflow is a manageable project that can deliver immediate value. While the specific clicks may vary depending on whether you use Zendesk’s native integration or a third-party platform like Zapier or Workato, the core principles and steps remain the same. Follow this process to get started.
- Define Your Escalation Tiers and Triggers. Before you build anything, decide what warrants an automated escalation. Is it when 50% of the SLA time has passed? Or 80%? Define clear, unambiguous rules. For example, a “Tier 1” escalation might be a notification to the support team’s channel when a high-priority ticket is 60 minutes from breaching its SLA. A “Tier 2” escalation could be a notification to a manager’s channel if the same ticket is 15 minutes from breaching.
- Configure Your Trigger in Zendesk. Inside Zendesk, you will create an “Automation” or “Trigger” based on the rules you just defined. The conditions will look something like this: “If Ticket Priority is High AND Status is not Solved AND Hours until next SLA breach is less than 1…” This is the engine of your workflow, so be precise with your conditions to avoid false alarms.
- Set Up Your Slack Target Channels. This is a crucial step. Do not send all your alerts to a noisy, general-purpose channel. Create dedicated, specific channels for escalations, such as
#p1-ticket-escalationsor#finance-billing-urgent. This ensures the alerts are seen by the relevant people without creating notification fatigue for the rest of the company. Consider making these private channels for sensitive issues. - Craft an Actionable Slack Message. The notification itself must be useful. A simple “Ticket #12345 is at risk” is not enough. Your message should be a concise summary that enables immediate action. Include key placeholders for dynamic information from the ticket. For example:
SLA Breach Alert: P1 Ticket
Ticket ID: {{ticket.id}}
Customer: {{ticket.organization.name}}
Subject: {{ticket.title}}
Time to Breach: {{ticket.sla_next_breach_at}}
Link: {{ticket.link}} - Connect Zendesk to Slack and Activate. Use your chosen integration method (native or third-party) to connect the Zendesk trigger to the Slack channel action. Map the data fields from Zendesk to the message format you created. Once configured, activate the workflow.
- Test, Monitor, and Refine. Your work is not done after activation. Create a few test tickets that meet your trigger conditions to ensure the workflow fires correctly. Monitor the Slack channel to see how your team responds. Gather feedback. You may find that your initial time threshold is too sensitive (creating too many alerts) or not sensitive enough (not providing enough time to act). Be prepared to adjust your rules based on real-world performance.
Beyond Customer Support: Real-World Scenarios for Business Teams
While customer support is the most obvious use case, the principle of automated escalation can be applied to almost any business unit that uses a ticketing or case management system. The combination of a structured request system (like Zendesk) and a real-time communication platform (like Slack) is a powerful pattern for improving responsiveness across an organization.
IT Operations
For an IT team, system downtime is critical. An automated workflow can escalate P1 outage tickets to the on-call incident response channel in Slack. This ensures that engineers are alerted immediately, bypassing email delays and kickstarting the resolution process faster.
Finance and Billing
An urgent inquiry from a major client about a billing discrepancy could get lost in a generic finance queue. An automated escalation can flag the ticket based on the client’s status (e.g., a “VIP” tag) and push it to a dedicated #finance-escalations channel, ensuring the accounts team provides a swift and accurate response.
Human Resources
Sensitive employee relations issues require prompt and careful handling. When an employee submits a ticket to HR with keywords like “harassment” or “grievance,” a workflow can discreetly notify a private channel with only HR leadership, ensuring confidentiality and immediate high-level attention.
Sales Operations
A high-value prospect might submit a technical question through the support portal before signing a contract. If that ticket languishes, it could jeopardize the deal. An automation can identify tickets from pre-sales accounts and escalate them to a #sales-support-hotline channel, looping in both sales engineers and the account executive to provide a coordinated, priority response.
Supply Chain and Logistics
Imagine a ticket is created flagging a critical delay with an inbound parts shipment. If unresolved, this could halt a production line. An automated escalation can push this ticket to the #logistics-alerts channel, notifying the supply chain manager and warehouse foreman to begin working on a contingency plan immediately.
Measuring Success: Key Metrics to Track
To understand the impact of your automated escalation system, you need to track the right metrics. This isn’t about vanity numbers; it’s about measuring real changes in performance and efficiency. Focus on a mix of leading indicators (which measure the health of the process) and lagging indicators (which measure the final business outcome).
Leading Indicators
- Number of Automated Escalations Triggered: This fundamental metric confirms that your workflow is technically functioning. If the number is zero, your triggers may be misconfigured. If it’s too high, your rules may be too broad.
- Time to First Human Action on Escalated Tickets: After an alert is posted in Slack, how long does it take for a team member to acknowledge it (e.g., with an emoji reaction) or post a “I’m on it” message? This measures the effectiveness of the Slack channel itself.
Lagging Indicators
- SLA Attainment Rate (%): This is the ultimate measure of success. Has the percentage of tickets that meet their SLA improved since implementing the automation? Be sure to segment this by priority to see the impact on your most critical tickets.
– Average Resolution Time: For the specific category of tickets you are escalating, has the mean or median time to resolution decreased? This demonstrates increased efficiency.
– Customer Satisfaction (CSAT) Scores: Look at the CSAT scores for tickets that were handled via the automated escalation path. An improvement here suggests that faster, more proactive service is leading to a better customer experience.
Implementation Best Practices and Common Pitfalls
Building a successful automation requires more than just connecting two apps. It requires thoughtful design to ensure the system is helpful, not noisy. Keep these best practices in mind to avoid common pitfalls.
Checklist for Success:
- Start small. Don’t try to automate every escalation path at once. Pick one high-pain, high-value scenario, such as P1 tickets for your most important customer segment. Perfect that workflow before expanding.
- Use dedicated, private channels. For sensitive or high-signal alerts, create private Slack channels. This protects confidential information and ensures that only the people who need to act are notified.
- Define clear ownership. An alert is useless if no one is responsible for acting on it. In the channel’s topic or pinned messages, clearly state who is on point for acknowledging and assigning escalated tickets.
- Always link back to the source. Every Slack notification must contain a direct, one-click link back to the Zendesk ticket. This removes friction and allows team members to immediately access the full context.
Equally important is knowing what to avoid. A poorly designed system can do more harm than good.
Common Pitfalls to Avoid:
- Creating alert fatigue. If you escalate too many tickets, your team will start ignoring the notifications. Be highly selective about your triggers. An escalation should be a significant event, not routine noise.
- Using the wrong channel. Never pipe critical, time-sensitive escalations into a busy, general-purpose channel like
#general. The alert will be instantly buried and ignored. - Forgetting to train your team. Don’t just launch the new system and expect everyone to understand it. Hold a brief training session to explain what the alerts mean, who is responsible, and what the expected response protocol is.
- Automating without a human fallback. Your automation is a safety net, not a replacement for good management. Ensure there is always a clear manual process for escalating issues if the automation fails or for edge cases that the system doesn’t cover.
A Note on Governance and Data Security
When you connect systems like Zendesk and Slack, you are moving data between platforms. While this integration is powerful, it’s essential to implement it with security and governance in mind. This doesn’t require a complex security audit, just a few common-sense precautions.
First, practice the principle of least privilege for access control. Use private Slack channels for escalations involving customer data. Regularly review the member list of these channels to ensure only currently authorized employees have access. If an employee changes roles or leaves the company, their access to these channels should be revoked as part of your standard offboarding process.
Second, think about data minimization. In the notification messages you send to Slack, include only the information necessary to provide context and enable action. Avoid sending highly sensitive Personally Identifiable Information (PII) like addresses, phone numbers, or financial details into a Slack channel. Instead, provide the ticket ID and a direct link, keeping the sensitive data secure within Zendesk, which is designed for that purpose.
Finally, remember that automation is a tool to assist human judgment, not replace it. The goal is to bring critical issues to the attention of your experts faster. The ultimate decision-making and problem-solving still rest with your team. Ensure your process includes clear points for human oversight and intervention.
Your Next Steps to Automated Escalations
Moving from a manual, reactive process to an automated, proactive one is a significant step toward operational excellence. It reduces risk, improves customer outcomes, and makes your team’s lives easier. You can start this journey today with a simple, focused plan.
- Identify the Pain: Look back at the last quarter. What was the single most painful or costly SLA breach your company experienced? This is your ideal candidate for a pilot program.
- Map the Process: On a whiteboard or in a document, map out the ideal escalation path for that specific scenario. Who needs to know, and when do they need to know it?
- Build a Proof of Concept: Using the steps outlined above, build a single, focused workflow for just that one scenario. Don’t worry about covering every edge case. Aim for a simple, effective solution.
- Measure and Share: Let your proof of concept run for a few weeks. Track the metrics. Then, present the results (e.g., “We improved response time on P1 finance tickets by 40%”) to a key stakeholder to get their buy-in for a broader rollout.
By taking a deliberate, step-by-step approach, you can build a robust automated escalation system that strengthens your service delivery and provides a scalable foundation for future growth.
Your Next Read:
Get a FREE
Proof of Concept
& Consultation
No Cost, No Commitment!