LinkedIn Lead Gen Forms are a powerful tool for marketers. They promise a frictionless experience for prospects, capturing intent at the peak of their interest with pre-filled fields. But for many organizations, that promise quickly sours. The “frictionless” process often opens the floodgates to a torrent of low-quality leads: students, competitors, job seekers, and contacts with personal email addresses. Your sales team ends up wasting precious time sifting through noise, good leads go cold waiting for manual qualification, and your CRM slowly fills with useless data. The result is a frustrated sales team, skewed marketing analytics, and a diminished return on your ad spend.
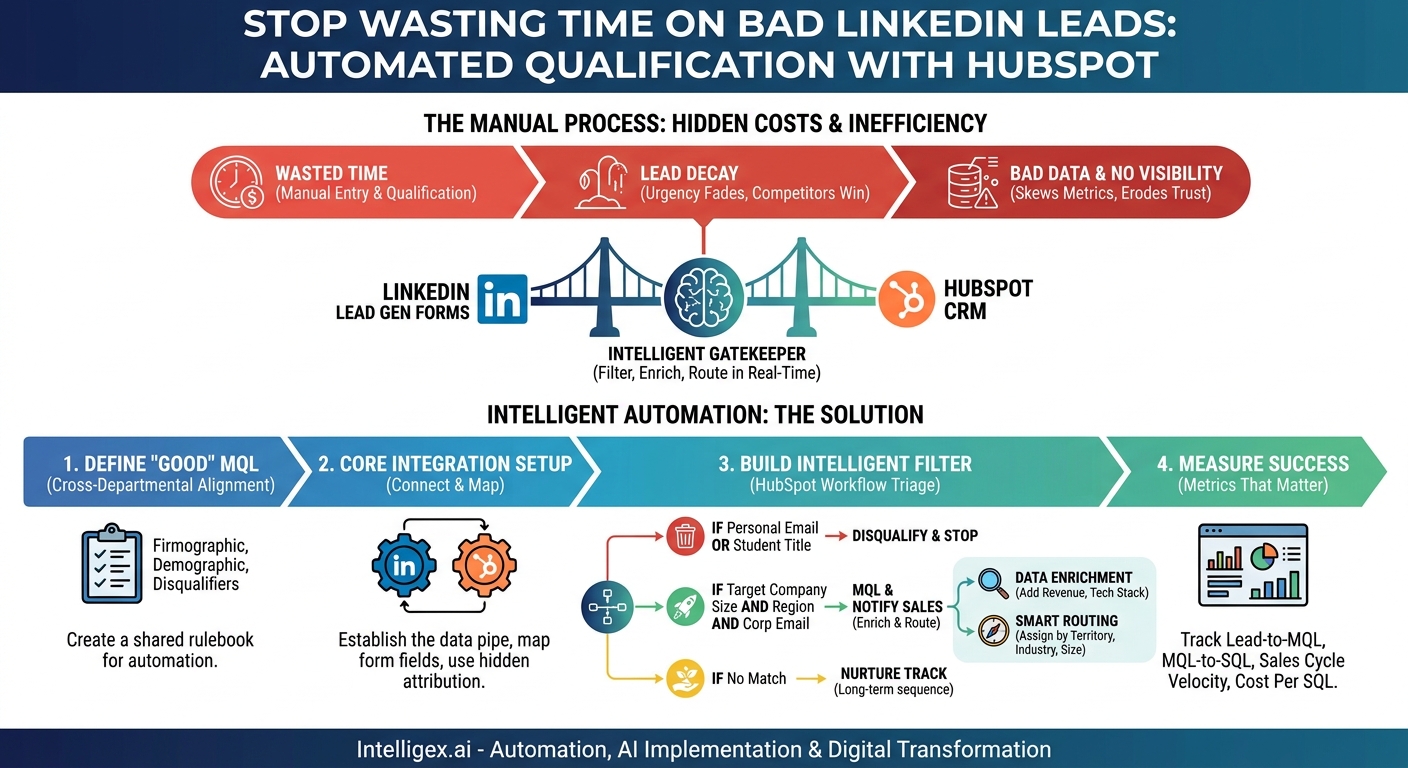
The solution isn’t to abandon this valuable channel. It’s to build an intelligent, automated bridge between LinkedIn and your HubSpot CRM. A proper integration does more than just sync contacts. It acts as a sophisticated gatekeeper, one that filters, enriches, and routes leads in real-time. This transforms your lead generation from a manual, reactive chore into a strategic, automated system that delivers high-quality, sales-ready leads with speed and precision.
Why Your Manual Lead Gen Process is Costing You More Than You Think
Many marketing teams rely on a process that involves manually downloading CSV files from LinkedIn Campaign Manager and uploading them into HubSpot. While this seems straightforward, the hidden costs associated with this manual workflow are substantial and impact multiple departments.
First, there’s the direct cost of wasted time. A marketing operations specialist spending hours each week on data transfer is not focusing on campaign optimization or strategy. More importantly, your sales development reps (SDRs) or account executives are forced to perform manual lead qualification, a task they are often overqualified for and which takes them away from what they do best: selling. Every minute they spend researching a lead to see if it’s a student or from a target industry is a minute they aren’t engaging a genuine prospect.
Second is the opportunity cost of lead decay. Lead value is perishable. Studies have consistently shown that the odds of connecting with a new lead decrease dramatically within the first hour. When a prospect fills out a form, their interest is at its peak. If it takes your team 24 or 48 hours to manually process and assign that lead, the prospect’s urgency has faded. They may have already moved on to a competitor or forgotten why they downloaded your content in the first place.
Third, manual processes introduce significant data quality issues. Typos from CSV manipulation, inconsistent formatting, and the lack of validation mean bad data enters your CRM from day one. This pollution has long-term consequences. It makes segmentation for future marketing campaigns difficult, skews reporting on conversion rates, and erodes the sales team’s trust in the data provided by marketing. When Sales can’t trust the MQLs they receive, they stop following up on them, creating a vicious cycle of misalignment and wasted budget.
Finally, a manual process completely obscures visibility into true campaign performance. It becomes incredibly difficult to track a lead from a specific LinkedIn ad all the way through to a closed-won deal in HubSpot. This makes it nearly impossible to calculate an accurate return on investment (ROI) for your campaigns, leaving you to make future budget decisions based on gut feelings rather than hard data.
The Foundation: Defining a “Good” MQL Before You Integrate
Technology cannot solve a strategy problem. Before you connect a single system or build any automation, you must achieve cross-departmental alignment on one critical question: What, precisely, is a Marketing Qualified Lead (MQL) for our business? Without a clear, documented, and agreed-upon definition, your integration will only accelerate the delivery of leads that Sales will reject. This is the single most important step in the entire process.
This definition acts as the rulebook for your automation. Your HubSpot workflows will use these criteria to make decisions on whether to disqualify, nurture, or immediately route a new lead to sales. Getting this right prevents frustration and ensures that marketing and sales are working toward the same goal.
Your MQL Definition Checklist
Schedule a meeting with key stakeholders from both sales and marketing leadership. Use the following checklist to guide the conversation and document your official MQL criteria.
- Firmographic Criteria: These are attributes of the prospect’s company. What does your ideal customer profile (ICP) look like? Define your target industries, company sizes (e.g., 50-500 employees), and geographic regions (e.g., North America, EMEA).
- Demographic Criteria: These are attributes of the individual contact. Specify the job titles or functions you want to target (e.g., “Director of Operations,” “VP of Finance”). Just as important, list the titles you want to exclude (e.g., “Student,” “Intern,” “Assistant”).
- Explicit Disqualifiers: What are the immediate red flags that make a lead unqualified, regardless of other criteria? A common and highly effective rule is to disqualify leads who use a personal email domain (like gmail.com, outlook.com, or yahoo.com). Other disqualifiers could include contacts from known competitor domains.
- Behavioral Data: While a LinkedIn Lead Gen form submission is a strong signal, consider what other context matters. For this integration, the primary behavior is the form submission itself, linked to a specific asset (like a webinar or a whitepaper).
- Data Completeness: Decide on the minimum information required to qualify a lead. A name and a corporate email address are often the bare minimum. You cannot qualify a lead based on company size if that data point is missing.
The output of this exercise should be a simple, one-page document that is shared and approved by both teams. This “service-level agreement” (SLA) for lead quality is your blueprint for building an effective and trusted automation engine.
Setting Up the Core Integration: A Step-by-Step Guide
With your MQL definition in hand, you can now establish the technical connection between LinkedIn and HubSpot. HubSpot provides a native integration that makes this initial setup relatively straightforward. This integration will act as the “pipe” that brings lead data into your CRM, where your custom workflows will then apply the filtering logic you’ve defined.
Follow these steps to get the basic sync running. Remember to be logged in as an administrator in both your HubSpot portal and your LinkedIn Campaign Manager account.
- Connect Your LinkedIn Ads Account to HubSpot: In your HubSpot portal, navigate to the settings gear icon in the top right. In the left-hand menu, go to Marketing > Ads. Click the “Connect account” button and follow the prompts to authorize HubSpot to access your LinkedIn account. You will be asked to select the specific ad accounts you want to sync.
- Enable Lead Syncing: Once the account is connected, ensure that lead syncing is turned on. This is typically a toggle switch in the ads account settings within HubSpot. This gives HubSpot permission to automatically pull in new leads from any active Lead Gen Form in the connected account.
- Map Your Form Fields: This is a crucial step. For each of your LinkedIn Lead Gen Forms, you need to tell HubSpot where to put the incoming data. For example, you will map the “First Name” field from your LinkedIn form to the “First Name” contact property in HubSpot. Do this for every field on your form, such as Last Name, Email, Company Name, and Job Title. Pay close attention to custom fields.
- Use Hidden Fields for Attribution: LinkedIn Lead Gen Forms allow you to add hidden fields. This is a powerful feature for tracking. You can create hidden fields on your form for `utm_source`, `utm_campaign`, and `utm_medium`. You then map these hidden fields to corresponding custom properties in HubSpot. This ensures that every lead is tagged with its precise origin, giving you crystal-clear campaign attribution.
- Test Your Integration: Never assume the connection is working perfectly. The best way to test is to submit a real lead through your form. You can do this by finding your ad in the LinkedIn feed and submitting the form with unique test information. Then, go into HubSpot and verify that the new contact was created and that all fields, including your hidden attribution fields, were populated correctly.
Completing these steps creates a direct data flow. Now, any new submission on your LinkedIn forms will appear as a contact in HubSpot within minutes. However, at this stage, it’s still a “dumb pipe.” It brings everyone over, good and bad. The next step is to build the intelligence.
Building Your Intelligent Filter: Using HubSpot Workflows to Triage Leads
This is where you bring your MQL definition to life. Using HubSpot’s workflow automation, you can inspect every single lead that comes from LinkedIn and automatically sort it into the correct bucket. This workflow becomes your 24/7, instantaneous lead qualification specialist.
Create a new “Contact-based” workflow in HubSpot. The enrollment trigger will be the key: set it to enroll contacts when they have filled out a specific form. To make this scalable, it’s best to use a naming convention for your LinkedIn forms (e.g., “LI-Lead-Gen – Ebook – Q3”) and set the trigger to “Form submission where form name contains ‘LI-Lead-Gen’.”
Example Workflow Logic
Your workflow will use if/then branches to evaluate each lead against the MQL criteria you defined earlier.
Branch 1: Automatic Disqualification
- If… The contact property `Email` contains any of “@gmail.com, @yahoo.com, @outlook.com” OR the `Job Title` contains any of “Student, Intern, University”.
- Then…
- Set the contact property `Lifecycle Stage` to “Other”.
- Add the contact to a static list named “LinkedIn Disqualified – Free Email/Student”.
- Stop the workflow. Do not notify sales or create a deal.
Branch 2: Marketing Qualified Lead (MQL)
- If… The contact property `Company Size` is greater than “50” AND the `Country/Region` is any of “United States, United Kingdom, Canada” AND the `Email` does not contain any of “@gmail.com, @yahoo.com”.
- Then…
- Set the `Lifecycle Stage` to “Marketing Qualified Lead”.
- Send an internal email notification to your sales routing system or a general sales alias. The email should include key contact properties to give reps instant context.
- Create a task for the contact owner to follow up.
Branch 3: Nurture Track
- This final branch acts as a catch-all. If a lead doesn’t meet the disqualification or MQL criteria, they may still be a valuable future prospect.
- If… The lead has not met any of the above conditions.
- Then…
- Set the `Lifecycle Stage` to “Lead”.
- Enroll them in a relevant, long-term email nurture sequence related to the content they downloaded.
This automated triage ensures that your sales team only ever sees leads that have passed a rigorous, pre-defined set of criteria. Their time is protected, and they can engage with hot, qualified leads immediately.
Enrichment and Routing: From Good MQL to Sales-Ready Lead
Filtering is only the first step. To make your sales team truly effective, you need to provide them with context-rich leads and deliver those leads to the right person. This is where data enrichment and advanced routing come into play.
Automated Data Enrichment
A LinkedIn Lead Gen form can only ask for so much information before friction hurts conversion rates. You might get a name, title, and company, but what about annual revenue, industry classification, or the technologies the company uses? This is where data enrichment tools are invaluable.
Within your MQL workflow branch, after a lead has been qualified, you can add a workflow step to enrich the contact record. HubSpot has some native data enrichment capabilities, and it also integrates seamlessly with third-party data providers like ZoomInfo, Clearbit, and others. This action sends the known information (like email or company domain) to the provider and gets back a wealth of firmographic and demographic data, which is then written to the contact’s properties in HubSpot.
Intelligent Lead Routing
With this newly enriched data, you can replace a generic “notify sales” step with a highly intelligent routing system. Instead of sending all MQLs to a single queue, you can create new if/then branches based on the enriched data.
- Territory Routing: If the enriched property `State/Region` is “California” or “Washington,” rotate the lead owner between West Coast sales reps.
- Industry Routing: If the enriched `Industry` property is “Financial Services,” assign the lead to your FinTech sales specialist.
- Account Size Routing: If the enriched `Annual Revenue` property is greater than “$1 Billion,” assign the lead and create a high-priority task for a member of the Enterprise sales team.
This level of automation ensures that not only is the lead qualified, but it’s also delivered to the salesperson with the most relevant expertise to handle it. This dramatically shortens response times and improves the quality of the first conversation, leading to higher conversion rates down the funnel.
Measuring Success: The Metrics That Matter
To justify the investment in building this system and to continuously improve it, you need to track the right metrics. Go beyond vanity metrics like the number of raw leads generated. Focus on metrics that demonstrate business impact and the efficiency of your new process.
Create a dedicated dashboard in HubSpot to monitor the performance of your LinkedIn lead qualification engine.
- Lead-to-MQL Conversion Rate: This is the percentage of total raw leads from LinkedIn that successfully pass your workflow filters and become MQLs. A low rate might mean your ad targeting is too broad, while a very high rate could indicate your MQL criteria are too loose.
- MQL-to-SQL Conversion Rate: Of the leads you flag as MQLs, what percentage does the sales team accept as Sales Qualified Leads (SQLs)? This is the ultimate measure of marketing-sales alignment and the accuracy of your MQL definition.
- Sales Cycle Velocity: Measure the average time it takes for a contact created via a LinkedIn Lead Gen form to become a closed-won customer. Automation should significantly reduce this time by eliminating manual delays.
- Cost Per MQL and Cost Per SQL: While your Cost Per Lead (CPL) from LinkedIn might stay constant, your Cost Per MQL should drop as you stop wasting ad spend on leads that are instantly disqualified. An even more powerful metric is the reduction in Cost Per SQL, which reflects the true efficiency of your entire funnel.
- CRM Data Health: Monitor the percentage of new contacts that have complete firmographic data (like industry and company size) and a corporate email address. This should trend upward as your enrichment and filtering processes mature.
Governance and Data Privacy Considerations
Automating critical business processes like lead management requires a layer of governance to ensure stability, security, and compliance. While automation is powerful, it should not be a “black box.”
First, implement access control. The ability to edit your lead qualification and routing workflows in HubSpot should be limited to a small, trained group of individuals, typically in Marketing Operations or Revenue Operations. This prevents well-meaning but untrained colleagues from accidentally breaking the logic and halting lead flow.
Second, be mindful of data privacy. The information you collect via LinkedIn and enrich with other tools is subject to regulations like GDPR and CCPA. Ensure your data handling processes are compliant, your privacy policy is up to date, and you are managing consent appropriately. Document your lead-flow process to demonstrate how personal data is collected, processed, and used.
Finally, incorporate a human review process. Automation is not a substitute for strategic oversight. Schedule a quarterly review of your system. Analyze a sample of the leads that were automatically disqualified. Are your rules too strict and catching false positives? Look at the MQLs that sales rejected. Is there a pattern that suggests your MQL definition needs to be refined? This continuous feedback loop between the automated system, the data, and your teams is what turns a good setup into a great one.
Your Next Steps: An Action Plan
You now have a blueprint for transforming your LinkedIn lead generation from a slow, manual process into a highly efficient, automated engine that fuels your sales team with quality leads. The key is to move beyond a simple sync and build layers of intelligence using the tools you already have.
Here is a simple plan to get started:
- Audit Your Current State: Look at the last 500 leads you generated from LinkedIn. Manually categorize them: How many were junk? How many were good but took too long to follow up with? Calculate the potential revenue lost and time wasted to build your business case.
- Define Your MQL Criteria: Schedule the critical MQL definition meeting with sales leadership. Use the checklist in this article to come away with a clear, documented set of rules that everyone agrees on.
- Implement and Test: Start by connecting the native integration. Then, build your first filtering workflow based on your MQL definition. Activate it for a single campaign first to test the logic in a controlled environment before rolling it out to all campaigns.
- Measure and Iterate: Build your measurement dashboard in HubSpot from day one. Monitor your key metrics weekly. Use the data to have informed conversations with the sales team and to make incremental improvements to your targeting, your MQL criteria, and your workflow logic.
By taking a strategic, automated approach, you can finally realize the full promise of LinkedIn Lead Gen Forms: a scalable, high-quality source of revenue for your business.
Related Posts
Get a FREE
Proof of Concept
& Consultation
No Cost, No Commitment!