You’ve done it. After hours of research, writing, and editing, your latest masterpiece is ready. The cursor hovers over the “Publish” button, a gateway to sending your work out into the world. You click it, feel a rush of accomplishment, and share the link. Then, you see it. A glaring typo in the second sentence. A broken link. An image that’s horribly misaligned on mobile. That initial pride quickly curdles into a frantic scramble to fix the errors before too many people notice.
This digital face-plant is an all-too-common experience for content creators. In the rush to meet deadlines and feed the content beast, the final, crucial step of quality assurance (QA) is often rushed or skipped entirely. But publishing content without a thorough QA process is like a chef sending out a dish without tasting it first. It might be fine, but it could also be a disaster that damages your reputation. A systematic content QA checklist isn’t a bottleneck; it’s your brand’s most important safety net. It transforms the act of publishing from a hopeful gamble into a confident, strategic move.
Why a Content QA Checklist is Non-Negotiable
Before diving into the nuts and bolts of the checklist itself, it’s essential to understand why this process is so critical. A dedicated QA workflow is more than just catching typos; it’s a foundational pillar of a successful content strategy that impacts everything from brand perception to your bottom line.
- It Protects Brand Credibility: Your content is a direct reflection of your brand. Consistent errors, no matter how small, signal carelessness and a lack of professionalism. Readers subconsciously associate the quality of your content with the quality of your products or services. A clean, polished article builds trust; a sloppy one erodes it.
- It Enhances User Experience (UX): Good QA is good UX. A post that is easy to read, visually appealing, and functionally sound provides a positive experience for the user. Broken links, slow-loading images, and confusing formatting create friction, causing frustrated visitors to click away—often for good.
- It Boosts SEO Performance: Search engines like Google prioritize high-quality, user-friendly content. A solid QA process directly addresses key SEO factors. Checking for proper heading structures, image alt text, internal links, and mobile responsiveness are all tasks that please both human readers and search engine crawlers. Ignoring them can actively harm your rankings.
- It Saves Time and Reduces Stress: Fixing an error after a piece of content has been published, shared on social media, and sent out in an email newsletter is a chaotic and stressful process. It involves editing the live post, clearing caches, and hoping the updated version propagates correctly. Catching those same errors beforehand is a simple, low-stress fix that saves significant time and effort in the long run.
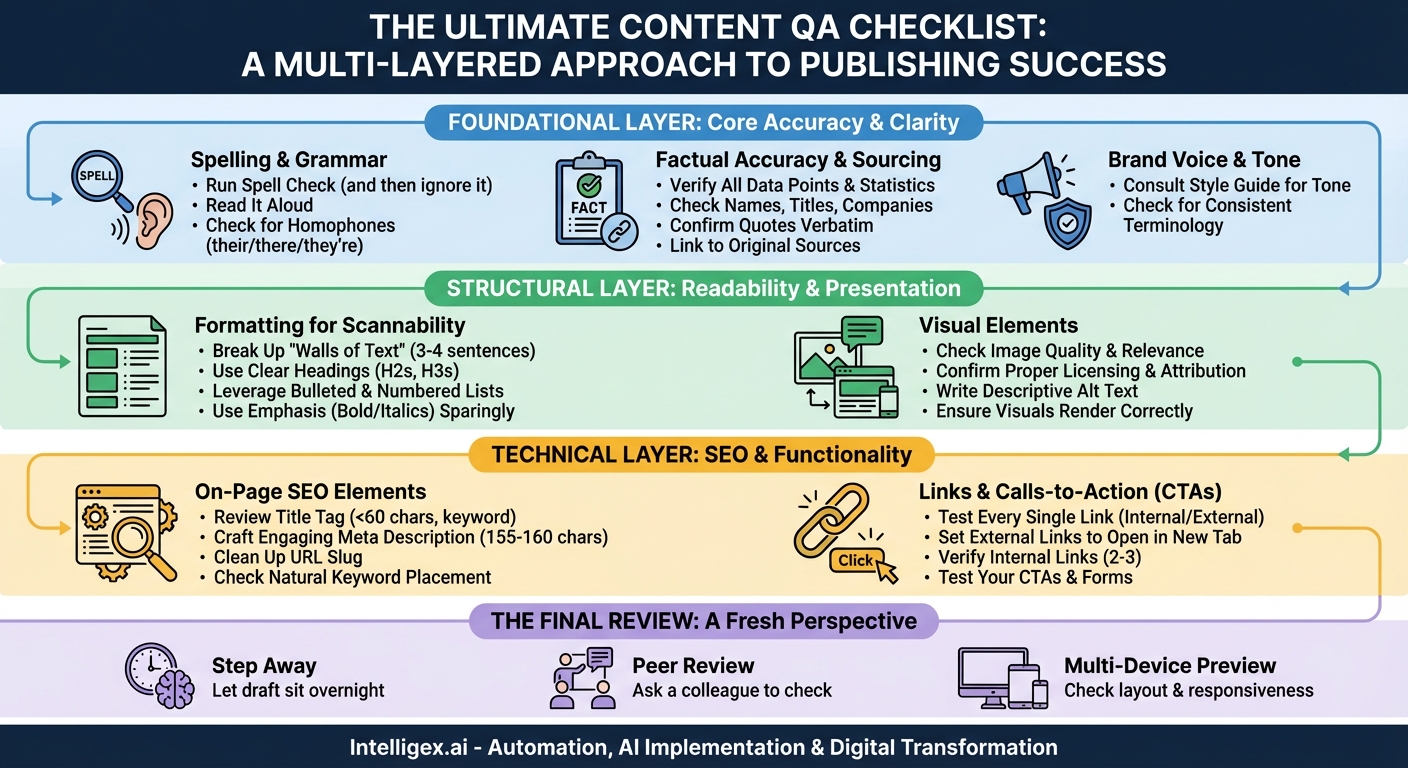
The Ultimate QA Checklist: A Multi-Layered Approach
A truly effective QA process isn’t a single, monolithic step. It’s a series of layers, each focusing on a different aspect of the content. By breaking it down, you ensure no detail, from a misplaced comma to a broken CTA, slips through the cracks. We’ll approach this as three distinct layers: The Foundational Layer (accuracy and clarity), The Structural Layer (readability and flow), and The Technical Layer (SEO and functionality).
The Foundational Layer: Core Accuracy and Clarity
This first layer is all about the substance of your content. If you get this part wrong, no amount of formatting or SEO optimization can save it. This is your check for correctness, coherence, and brand alignment.
Spelling and Grammar
- Run a Spell Check (and then ignore it): Start with an automated tool like your word processor’s built-in spell checker or a more advanced service like Grammarly or ProWritingAid. This is great for catching obvious misspellings and grammatical flubs.
- Read It Aloud: This is a game-changer. Your ear will catch awkward phrasing, run-on sentences, and grammatical errors that your eyes, accustomed to the text, will skim right over. If it sounds clunky when you say it, it will read clunky.
- Check for Homophones: Automated tools often miss correctly spelled but incorrectly used words (e.g., “their” vs. “there” vs. “they’re”; “your” vs. “you’re”; “affect” vs. “effect”). A manual read-through is essential to catch these common culprits.
Factual Accuracy and Sourcing
- Verify All Data Points: Are you citing a statistic? Double-check the number and the source. Is it from a reputable, up-to-date study? A five-year-old statistic about social media usage is likely irrelevant today.
- Check Names, Titles, and Companies: Ensure all proper nouns are spelled correctly. Misspelling a person’s name or a company’s name is a quick way to lose credibility, especially if you are mentioning them as an authority.
- Confirm Quotes: Make sure any quotes are attributed correctly and are verbatim from the original source.
- Link to Your Sources: When you present a fact or statistic, linking to the original source not only adds credibility but also provides value to the reader who may want to dig deeper.
Brand Voice and Tone
- Consult Your Style Guide: Does the writing align with your brand’s established voice? If your brand is playful and conversational, a dry, academic tone will feel out of place. If you’re a serious financial institution, too much slang will undermine your authority.
- Check for Consistent Terminology: Does your company call its customers “users,” “clients,” or “members”? Do you use an ampersand (&) or write out “and”? Consistency across your content is key to a professional presentation.
The Structural Layer: Readability and Presentation
Once you’re confident the content is accurate and on-brand, the next layer focuses on how it’s presented. This is about making the content as easy and enjoyable to consume as possible for your audience, many of whom are likely skimming on a mobile device.
Formatting for Scannability
- Break Up “Walls of Text”: No one wants to read a giant, intimidating block of text. Keep paragraphs short, ideally 3-4 sentences maximum.
- Use Headings and Subheadings: Use H2s and H3s to create a clear logical hierarchy. This helps readers scan the article to find the sections most relevant to them and helps search engines understand the structure of your content.
- Leverage Lists: Use bulleted lists (like this one) for non-sequential items and numbered lists for step-by-step instructions. They are incredibly effective at making information digestible.
- Use Emphasis Sparingly: Use bold and italics to draw attention to key terms and concepts, but don’t overdo it. Too much emphasis becomes no emphasis at all.
Visual Elements
- Check Image Quality and Relevance: Are all images high-resolution and not pixelated? Do they genuinely add value to the content, or are they just generic stock photos?
- Confirm Proper Licensing and Attribution: Do you have the right to use these images? If they require attribution, is it included correctly?
- Write Descriptive Alt Text: Every image should have alt text. This is crucial for accessibility (screen readers use it to describe the image to visually impaired users) and for SEO (it gives search engines context about the image). It should be a concise, accurate description of what the image depicts.
- Ensure Visuals Render Correctly: Well-placed visual elements—like charts, custom graphics, and the comprehensive checklist infographic you’ll find in this post—break up the text and illustrate complex points in a digestible way. Ensure they are not stretched or distorted.
The Technical Layer: SEO and Functionality
This final layer is the “under the hood” check. It ensures that your content is not only great for humans but is also properly optimized to be found by search engines and that all its interactive elements work as intended.
On-Page SEO Elements
- Review the Title Tag: Is it compelling, under 60 characters, and does it include your primary keyword near the beginning? The title tag is what appears in the browser tab and on the search engine results page (SERP).
- Craft a Meta Description: While not a direct ranking factor, the meta description is your ad copy on the SERP. It should be an engaging summary of the post (around 155-160 characters) and include a call to action to encourage clicks.
- Clean Up the URL Slug: The URL should be short, descriptive, and include your primary keyword. Remove stop words like “a,” “the,” and “is.” For example, a good slug is `/content-qa-checklist`, not `/the-ultimate-guide-to-our-content-qa-checklist-for-2023`.
- Check Keyword Placement: Is your primary keyword naturally integrated into your title tag, meta description, at least one subheading (H2), and within the first 100 words of your introduction? Are related secondary keywords used throughout the body? Avoid “keyword stuffing.” The usage should feel natural.
Links and Calls-to-Action (CTAs)
- Test Every Single Link: Click every internal and external link in the article to ensure it goes to the correct destination and isn’t broken (leading to a 404 error).
- Set External Links to Open in a New Tab: This is a best practice for user experience. It allows readers to check out an external source without losing their place on your website.
- Verify Internal Links: Have you included 2-3 relevant links to other content on your own site? This helps with SEO and keeps users engaged on your site longer.
- Test Your CTAs: Does your primary call-to-action work? If it’s a button, does it go to the right landing page? If it’s a form, does the submission process work correctly? A broken CTA means a lost lead or conversion.
The Final Review: A Fresh Perspective
Even after going through all three layers, there’s one final, indispensable step: get a fresh pair of eyes.
- Step Away: If possible, let the draft sit overnight. When you come back to it after a break, you’ll be amazed at the simple mistakes you suddenly notice.
- Ask a Colleague for a Peer Review: You are too close to your own work. You know what it’s *supposed* to say, so your brain will automatically correct errors as you read. A colleague who is seeing it for the first time will spot the things you’ve become blind to.
- Check the Preview on Multiple Devices: Before you hit publish, use the “Preview” function. Look at it on a desktop, a tablet, and a mobile phone. Does the layout hold up? Are the images responsive? Is the text readable on a small screen? This is your last chance to catch formatting issues before the world sees them.
Implementing a rigorous QA checklist might seem like it adds time to your content production process, but the return on that investment is immeasurable. It builds a reputation for quality, fosters reader trust, improves your SEO, and ultimately, drives better results. It turns the stressful, hopeful click of the “Publish” button into a confident action, secure in the knowledge that what you are sending out into the world is accurate, polished, and professional.
Related Posts


Category:
Get a FREE
Proof of Concept
& Consultation
No Cost, No Commitment!