

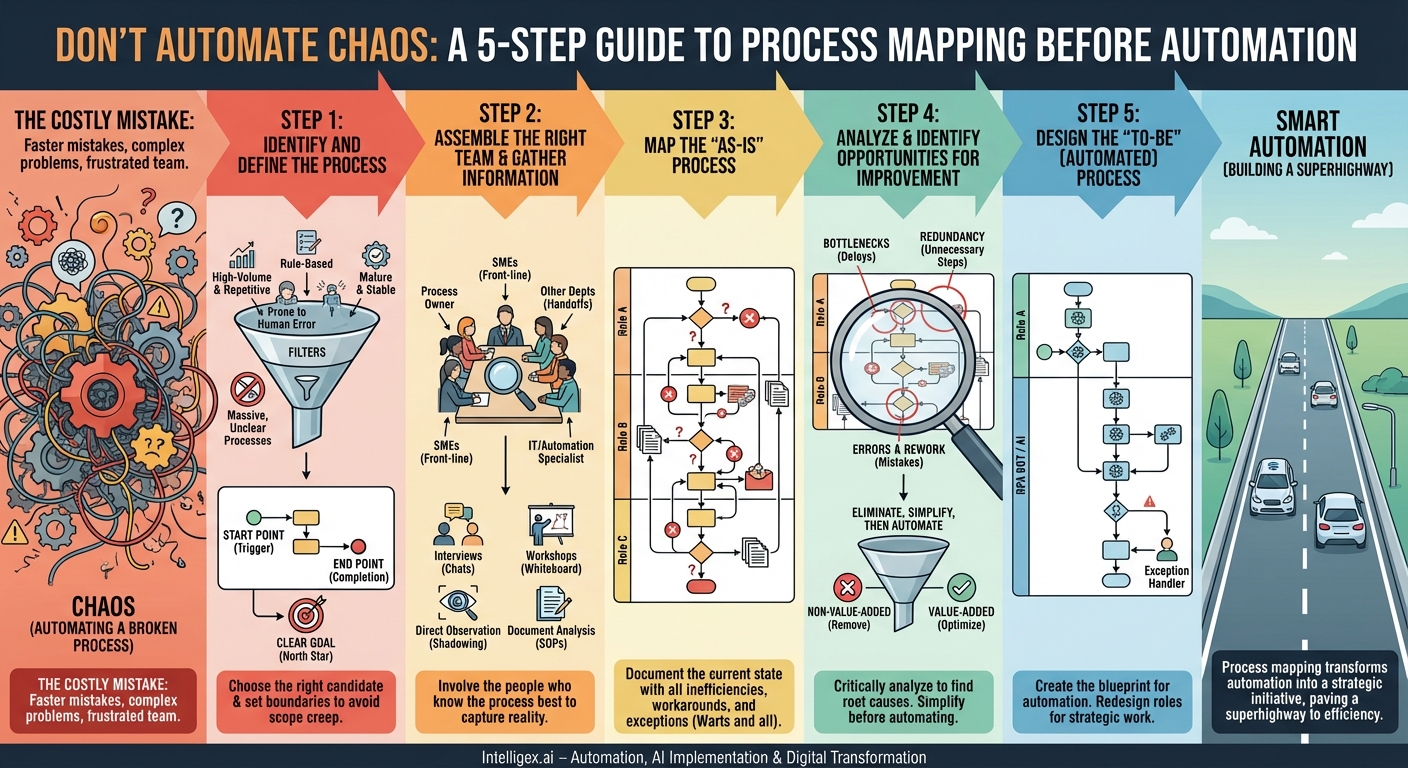
In the relentless pursuit of efficiency, businesses are turning to automation with unprecedented enthusiasm. Robotic Process Automation (RPA), artificial intelligence (AI), and intelligent workflows promise to slash costs, eliminate errors, and free up human talent for more strategic work. It’s an intoxicating vision: a seamless, lightning-fast operation where tedious tasks simply vanish. But in the rush to embrace this future, many organizations make a critical, and often costly, mistake. They try to automate chaos.
Automating a poorly understood, inefficient, or broken process doesn’t fix it. It just makes a bad process run faster. You end up with faster mistakes, more complex problems, and a frustrated team wondering why the promised benefits of automation never materialized. It’s like paving a meandering cow path instead of designing a straight, modern highway. You’ll have a smoother ride, but you’re still taking the long, inefficient route.
The antidote to this common pitfall is surprisingly low-tech: process mapping. Before a single line of code is written or a single bot is configured, you must first gain a crystal-clear, granular understanding of the process you intend to automate. Process mapping is the disciplined act of visualizing a workflow from beginning to end, identifying every task, decision, and handoff along the way. It’s the foundational blueprint that separates successful automation initiatives from expensive failures. By investing the time upfront to map, analyze, and optimize, you ensure you’re building your automated future on a solid foundation. This five-step methodology provides a structured path to doing just that.
Step 1: Identify and Define the Process
You can’t map what you haven’t defined. The first step is to choose the right process to target and to set clear boundaries around it. Not all processes are created equal, and not all are prime candidates for automation. Trying to boil the ocean by tackling a massive, enterprise-wide process is a recipe for disaster. Instead, start by identifying processes with the right characteristics.
Choosing the Right Candidate
Look for workflows that are:
- High-Volume and Repetitive: Tasks that are performed many times a day or a week, such as processing invoices, onboarding new employees, or generating standard reports, offer the greatest return on automation investment.
- Prone to Human Error: Manual data entry, copying and pasting between systems, and other repetitive tasks are fertile ground for mistakes. Automation can perform these tasks with near-perfect accuracy, improving data quality and reducing rework.
- Mature and Stable: Automating a process that is constantly in flux or poorly understood is like trying to hit a moving target. Choose a process that has been in place for some time and whose steps are generally consistent.
– Rule-Based: The best initial targets for automation involve clear, objective rules. The process should follow a predictable path based on “if-then” logic, with minimal need for subjective human judgment or complex decision-making.
Setting Clear Boundaries
Once you’ve selected a candidate process—let’s use “Accounts Payable Invoice Processing” as an example—you must define its scope. This means establishing an unambiguous start and end point. Without this, you risk “scope creep,” where the mapping exercise becomes an endless exploration of adjacent workflows.
- Start Point: What is the specific trigger that kicks off this process? For invoice processing, the start point might be “An invoice is received in the dedicated AP email inbox.” It is not “A vendor sends an invoice,” because you don’t control that. You control what happens once it arrives.
- End Point: What signifies the successful completion of the process? The end point could be “The invoice is approved and scheduled for payment in the ERP system.”
Finally, define the overall goal of the process. What is its purpose? For our example, the goal is “To accurately and efficiently process vendor invoices for timely payment while ensuring compliance with company policies.” This definition becomes your North Star, guiding all subsequent analysis and optimization efforts.
Step 2: Assemble the Right Team and Gather Information
Process mapping is not a solitary exercise performed by a manager in a corner office. A process map created in a vacuum is, at best, an idealized guess and, at worst, completely detached from reality. To capture a process accurately, you need to involve the people who live and breathe it every single day.
Building Your Cross-Functional Team
Your mapping team should represent a complete view of the process. Key roles include:
- Process Owner: This is the individual with overall responsibility for the process’s performance and outcomes. They provide strategic oversight and have the authority to approve changes.
- Subject Matter Experts (SMEs): These are the front-line employees who actually perform the work. They know the official steps, the unofficial workarounds, the common exceptions, and the hidden pain points. Their input is the most critical component of an accurate map.
- Representatives from Other Departments: If the process involves handoffs (and most do), include people from those upstream and downstream teams. In our invoice example, this might include someone from the procurement team who creates the purchase orders.
- IT/Automation Specialist: This person can provide insight into the existing systems and can begin to identify technical opportunities and constraints for automation early on.
Gathering the Raw Data
With the team assembled, the next task is to collect information about how the process actually works. Use a combination of methods to build a comprehensive picture:
- Interviews: Sit down one-on-one with the SMEs. Ask open-ended questions like, “Walk me through what you do from the moment an invoice arrives,” “What happens next?” and “What are the biggest frustrations you face?”
- Workshops: Bring the entire team together in a room (physical or virtual) with a large whiteboard. Facilitate a group discussion to map out the process collaboratively. This method is excellent for resolving differing perspectives in real-time and building consensus.
- Direct Observation: Words can sometimes fail to capture the nuances of a task. Sit with an employee and watch them perform the process. You’ll often uncover small, forgotten steps or inefficient habits that wouldn’t have come up in an interview.
- Document Analysis: Review any existing documentation, such as standard operating procedures (SOPs), training manuals, or checklists. While often outdated, these documents can provide a useful starting point and reveal the “official” version of the process, which can then be compared to the reality.
Step 3: Map the “As-Is” Process
This is where the information you’ve gathered comes to life. The goal of this step is to create a detailed, visual representation of the process as it currently exists—the “As-Is” state. This map must be an honest depiction, capturing all the inefficiencies, workarounds, and bottlenecks. Resist the temptation to map how the process *should* work; you must first document how it *actually* works, warts and all.
Choosing Your Mapping Format
While you can start with sticky notes on a wall, it’s best to use a standardized format. A swimlane diagram (also known as a cross-functional flowchart) is often the most effective tool for this purpose. Swimlanes are parallel lanes in the diagram, with each lane assigned to a specific person, role, or department. As the process moves from one step to the next, the visual flow crosses between these lanes, making it incredibly easy to see handoffs, which are often sources of delay and miscommunication.
Use simple, consistent symbols:
- Ovals/Rounded Rectangles: To indicate the start and end points.
- Rectangles: To represent a specific task or activity (e.g., “Open invoice PDF”).
- Diamonds: To show a decision point where the path splits (e.g., “Does invoice match PO?”).
- Arrows: To connect the shapes and show the flow of work.
Capturing the Granular Detail
As you build the map, be relentlessly detailed. For each step, capture key information:
- The Task: What is being done? (e.g., “Manually enter invoice number into ERP”).
- The Actor: Who is doing it? (e.g., “AP Clerk”).
- The Systems: What software or tools are used? (e.g., “Outlook, Adobe Reader, SAP”).
- Inputs and Outputs: What is needed to start the task, and what is produced at the end?
- Time: How long does this step typically take? (Both “touch time,” when someone is actively working on it, and “wait time,” when it’s sitting in a queue).
Most importantly, map the exceptions. What happens when an invoice is missing a PO number? What is the procedure for handling a price discrepancy? These exception paths are often where processes break down and where automation can provide immense value by standardizing the response.
Step 4: Analyze and Identify Opportunities for Improvement
An “As-Is” process map is more than just a picture; it’s a diagnostic tool. With the current state visualized, the team can step back and critically analyze it to find the root causes of inefficiency. This analysis phase is where you separate the “value-added” steps from the “non-value-added” steps. The goal is to simplify and standardize the process *before* applying automation.
Gather your team and review the map, asking probing questions:
- Where are the bottlenecks? Look for places where work piles up. Is there a single person who is a constant chokepoint for approvals? Do steps that require switching between multiple systems cause significant delays?
- What is redundant or unnecessary? Are employees entering the same data into three different spreadsheets? Is there an approval step that was implemented years ago for a reason that no longer exists? These are prime candidates for elimination.
- Where do errors and rework occur? Pinpoint the steps that frequently lead to mistakes. Manual data entry is a classic example. These are clear targets for automation to improve quality and accuracy.
- Why are we doing it this way? Challenge every step. The most dangerous phrase in business is “We’ve always done it this way.” The map forces you to justify the existence of each task.
- Which steps are ripe for automation? Specifically identify the tasks that are repetitive, rule-based, and involve digital data manipulation. These are your quick wins and the core components of your future automated workflow.
The mantra here is: Eliminate, Simplify, then Automate. Don’t just automate a redundant step; eliminate it. Don’t just automate a convoluted approval chain; simplify it first. This critical thinking ensures your automation efforts are focused on a lean, optimized version of the process, not the bloated original.
Step 5: Design the “To-Be” (Automated) Process
Finally, it’s time to design the future. Using the insights from your analysis, you will now create a new process map: the “To-Be” map. This diagram is the blueprint for your automation project. It illustrates what the process will look like after optimization and the introduction of automation technology.
Your “To-Be” map should be just as detailed as your “As-Is” map, but it will look significantly different. New swimlanes might appear, such as one for the “RPA Bot.” Many of the manual steps identified in the analysis will now be replaced by automated tasks.
Returning to our invoice processing example, the “To-Be” map might show:
- An RPA bot now monitors the AP inbox, downloads invoice attachments, and uses Optical Character Recognition (OCR) to extract the data. The manual data entry step is gone.
- The bot automatically validates the extracted data against the purchase order in the ERP system. The diamond-shaped decision point is now an automated rule.
- If everything matches, the bot directly enters the invoice for payment scheduling. This eliminates multiple manual steps and a significant time delay.
- Human involvement is redesigned. The AP Clerk is no longer a data entry operator but an “exception handler.” Their new role, clearly shown on the map, is to review and resolve the flagged invoices that the bot couldn’t process automatically (e.g., due to a mismatch or missing information).
This “To-Be” map serves two vital purposes. First, it creates a shared vision and clear requirements for the development team that will build the automation. Second, it acts as a powerful communication tool for stakeholders and the employees whose roles will be changing, helping them understand how the new process will work and how their contributions will become more valuable and strategic.
By diligently following these five steps, you transform automation from a risky gamble into a strategic, well-executed initiative. Process mapping demystifies the work, exposes hidden inefficiencies, and provides a clear, actionable roadmap to a more efficient and intelligent future. It ensures that when you finally “pave the path,” you’re building a superhighway, not just a smoother trail for your cows.
Your Next Read:
Get a FREE
Proof of Concept
& Consultation
No Cost, No Commitment!