

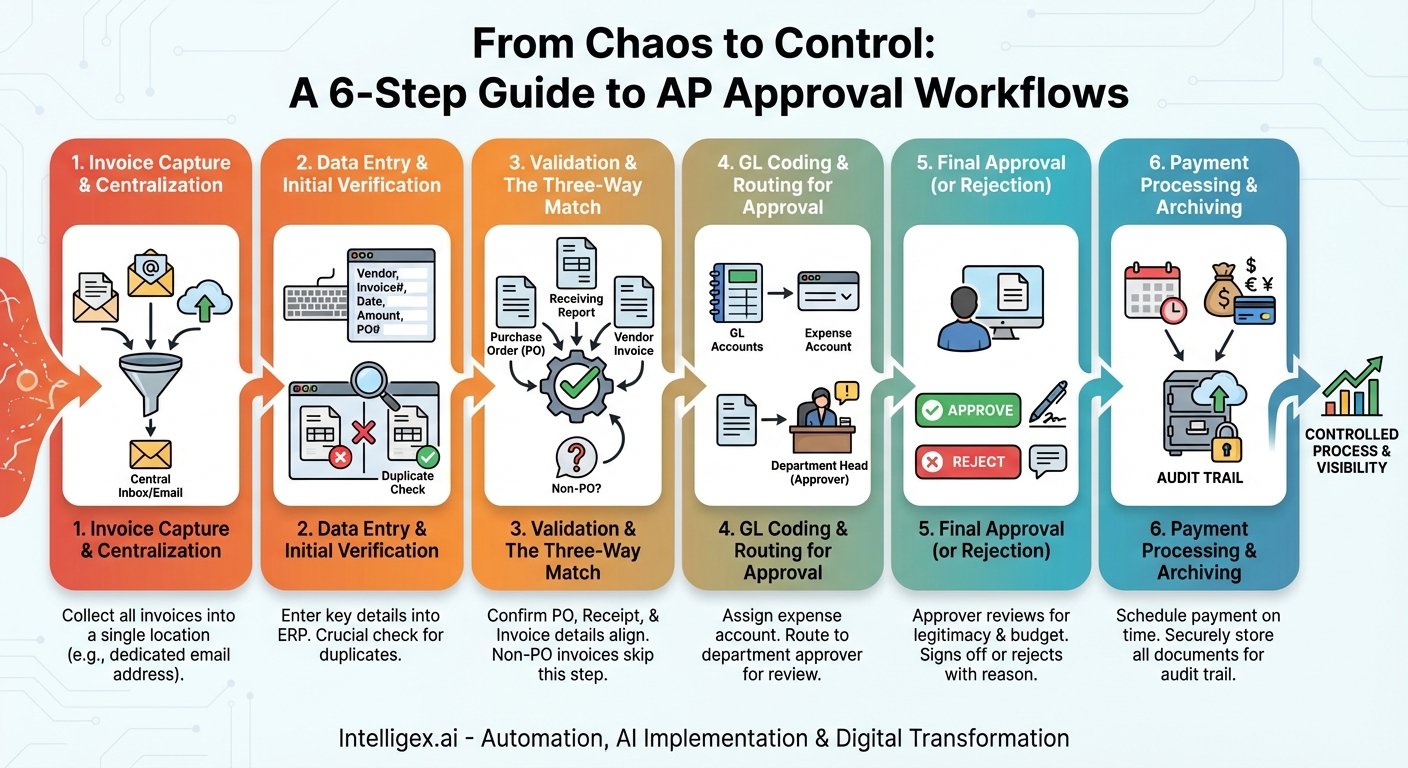
The journey of an invoice, from the moment it lands in your company’s mailbox (physical or digital) to the moment the payment leaves your bank account, can be a winding and treacherous path. For many businesses, especially those growing rapidly, this path is often unmarked, leading to lost documents, missed payment deadlines, frustrated vendors, and a complete lack of visibility into cash flow. This chaotic process isn’t just an administrative headache; it’s a significant financial risk. The solution is to pave a clear road: a well-defined Accounts Payable (AP) approval workflow.
An AP approval workflow is simply the series of sequential steps your organization follows to receive, review, approve, and pay an invoice. It transforms a reactive, often chaotic task into a proactive, predictable, and controlled business process. By establishing a clear set of rules and responsibilities, you bring order, accountability, and efficiency to one of your most critical financial functions. In this guide, we’ll break down the components of a fundamental AP approval workflow, a foundational model that any business can adopt to gain control over its payables.
The Hidden Costs of a Disorganized AP Process
Before diving into the steps of a structured workflow, it’s crucial to understand why it’s so important. Operating without a formal process might seem manageable when you’re handling only a handful of invoices per month, but this ad-hoc approach quickly breaks down as your business scales. The consequences can be more severe than you think.
- Financial Penalties: The most direct cost comes from late payment fees. When invoices get lost on desks or forgotten in inboxes, you miss due dates and incur unnecessary penalties. Equally costly is the loss of early payment discounts. Many suppliers offer a 1-2% discount for paying within a shorter window (e.g., 10 days instead of 30). A disorganized process makes it nearly impossible to consistently capture these valuable savings.
- Operational Inefficiency: Think of the time your team spends hunting down invoices, chasing managers for approvals, and manually entering the same data into multiple systems. This is time that could be spent on more strategic activities like financial analysis, budgeting, and forecasting. A lack of process also creates a single point of failure; if your one “AP person” is on vacation or leaves the company, the entire system can grind to a halt.
- Damaged Vendor Relationships: Your suppliers are your partners. Consistently paying them late damages trust and can harm your business’s reputation. This can lead to less favorable payment terms in the future, a reluctance from top-tier suppliers to work with you, or even a disruption in your supply chain if a critical vendor puts your account on hold.
- Increased Risk of Fraud and Error: Without a standardized review and approval process, your company is more vulnerable to both internal and external fraud. A duplicate payment might slip through, or a fraudulent invoice could be paid without proper scrutiny. Simple human error, like a typo during data entry, can lead to significant overpayments that are difficult to claw back.
The Anatomy of a Basic AP Approval Workflow
A robust workflow doesn’t need to be overly complex. The goal is to create a clear, repeatable process that ensures every invoice is properly vetted and authorized before payment. This basic workflow consists of six core stages, each with a distinct purpose.
Step 1: Invoice Capture and Centralization
The first step is to control the chaos of invoice intake. Invoices arrive through various channels—paper mail, email attachments, and supplier portals. The primary goal of this stage is to corral all incoming invoices into a single, centralized location.
This could be a designated physical inbox tray for mail or, more effectively, a dedicated email address like [email protected]. Instruct all your vendors to send their invoices to this one address. This simple act immediately prevents invoices from getting lost in individual employees’ inboxes and creates a single source of truth for all incoming bills. At this stage, a preliminary check is often done to ensure the document is, in fact, an invoice and is legible.
Step 2: Data Entry and Initial Verification
Once an invoice is captured, its key information must be entered into your accounting system or ERP. This is a critical data entry phase where accuracy is paramount. An AP clerk or administrator typically handles this task, recording essential details such as:
- Vendor Name
- Invoice Number
- Invoice Date
- Due Date
- Total Amount
- Purchase Order (PO) Number (if applicable)
During this step, a crucial verification check must occur: a search for duplicates. Your accounting software should be used to confirm that this exact invoice number from this vendor hasn’t already been entered. This simple check prevents one of the most common and costly AP errors—paying the same bill twice.
Step 3: Validation and the Three-Way Match
This is the heart of the verification process. The goal here is to confirm that the invoice is legitimate and that your company should, in fact, pay it. The gold standard for this validation is the three-way match, which is used for invoices associated with a Purchase Order.
The three-way match involves comparing three key documents:
- The Purchase Order (PO): The document your company issued to order the goods or services. It states the agreed-upon items, quantities, and prices.
- The Receiving Report (or Goods Receipt Note): The internal document that confirms what goods or services were actually received.
- The Vendor Invoice: The bill from the supplier requesting payment.
If the details on all three documents line up—the quantity, price, and item descriptions match—the invoice is validated. If there’s a discrepancy (e.g., the invoice is for 15 widgets but you only received 10), the invoice is flagged and sent back to the purchasing department or vendor to resolve the issue before it proceeds.
What about invoices without a PO? For recurring expenses like rent, utilities, or software subscriptions, a three-way match isn’t applicable. These “non-PO” invoices skip this step and move directly to the next stage for departmental approval.
Step 4: GL Coding and Routing for Approval
With the invoice validated, the next step is to correctly account for the expense. This is known as General Ledger (GL) coding. The AP team assigns the expense to the appropriate account(s) in the company’s chart of accounts. For example, an invoice from a marketing agency would be coded to the “Marketing Expense” account, while an invoice for new laptops would be coded to “Computer Hardware.”
Once coded, the invoice is routed to the correct person for approval. The approver is typically the head of the department that incurred the expense. For instance, the marketing invoice goes to the Head of Marketing, and the laptop invoice goes to the Head of IT. This ensures the person with the most context and budget ownership is the one who signs off on the expense.
Step 5: Final Approval (or Rejection)
The designated approver receives the invoice along with all its supporting documentation. Their responsibility is to review it and confirm two things:
- The goods or services were indeed received and are satisfactory.
- The expense is a legitimate business need and falls within their departmental budget.
The approver then makes a decision. If everything looks correct, they formally approve the invoice. This approval should be documented, whether with a physical stamp and signature on a paper invoice or a digital record in an email or system. If there’s a problem—the charge is incorrect, unauthorized, or a duplicate—they reject the invoice, providing a clear reason for the rejection. A rejected invoice is sent back to the AP team to investigate and resolve the issue with the vendor or internal team.
Step 6: Payment Processing and Archiving
Once an invoice has received final approval, it enters the payment queue. The AP team schedules the payment according to its due date and the company’s payment terms. The goal is to pay as close to the due date as possible to optimize cash flow, while still ensuring payment is made on time to capture any early payment discounts and maintain good vendor relations.
After the payment is executed (via ACH, check, wire transfer, or credit card), the transaction is recorded in the accounting system, closing the loop. The final, crucial action is to archive the invoice and all related documents—the PO, receiving report, proof of approval, and payment confirmation. This creates a clear, comprehensive audit trail that is essential for financial audits, dispute resolution, and historical analysis.
Best Practices for a Successful Workflow
Simply defining the steps isn’t enough; successful implementation requires a clear framework and communication.
- Document Everything: Create a formal, written policy that outlines your entire AP workflow. This document should be the single source of truth for how an invoice is handled.
- Define Roles and Responsibilities: Clearly state who is responsible for each step of the process. Who enters data? Who performs the three-way match? Who has the authority to approve invoices of certain amounts? This clarity prevents bottlenecks and confusion.
- Set Timelines and SLAs: Establish Service Level Agreements (SLAs) for each stage. For example, an approver might have 48 hours to approve or reject an invoice once it’s in their queue. This keeps the process moving and ensures bills are paid on time.
- Embrace Automation Where Possible: While this guide outlines a basic, often manual, workflow, the logical next step is automation. AP automation software can automate data entry using Optical Character Recognition (OCR), automatically perform three-way matching, route invoices based on preset rules, and provide a digital audit trail, drastically increasing efficiency and reducing errors.
Implementing a structured AP approval workflow is a foundational step toward achieving financial maturity. It moves your business away from reactive firefighting and toward proactive financial management. By bringing visibility, control, and efficiency to your payables process, you not only protect your bottom line but also build a stronger, more scalable foundation for future growth.
Your Next Read:
Get a FREE
Proof of Concept
& Consultation
No Cost, No Commitment!