

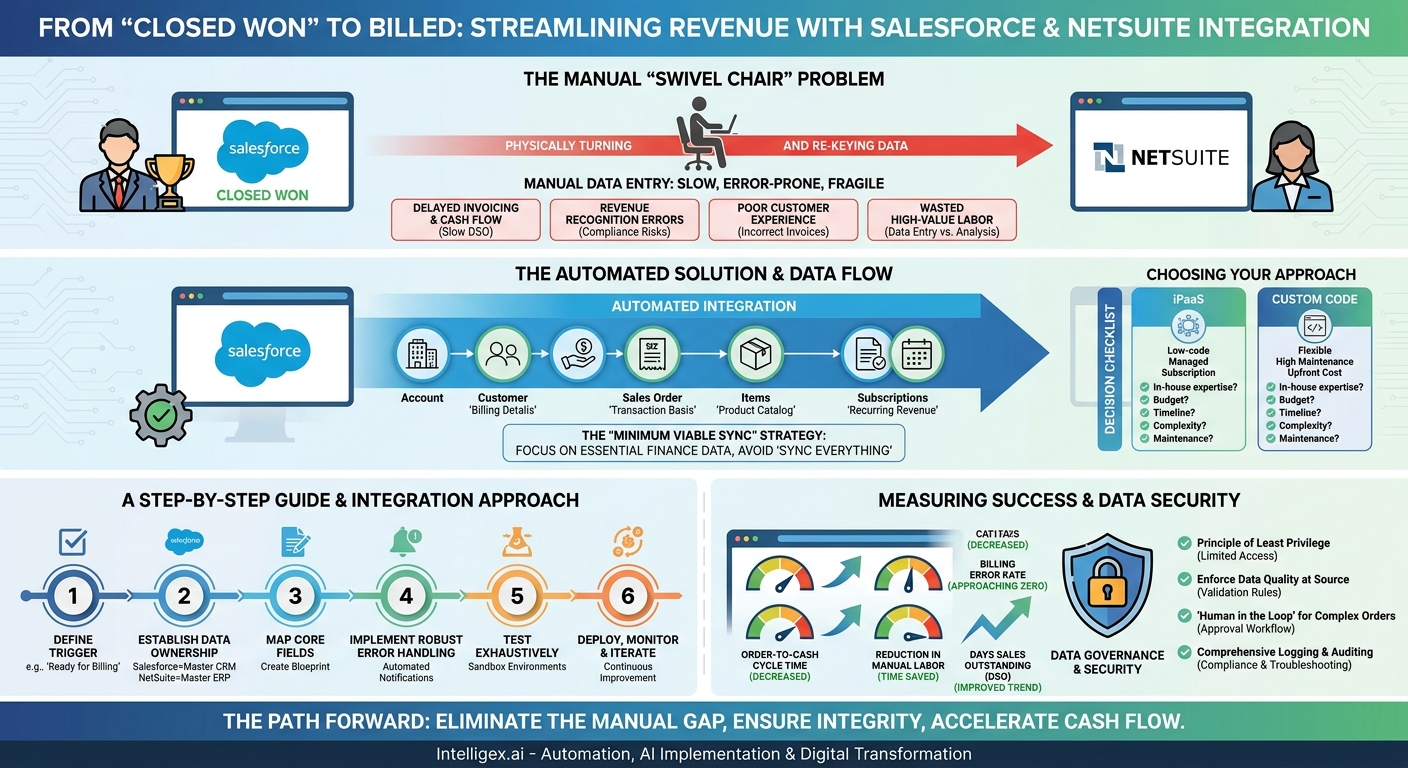
The deal is signed. Your sales team marks the opportunity “Closed Won” in Salesforce, and the celebration begins. But for your finance and operations teams, the celebration is short-lived. A new, often manual, and error-prone process is just kicking off: transferring all the critical details of that deal from the customer relationship management (CRM) system into the enterprise resource planning (ERP) system to set up billing. This “swivel chair” workflow, where a person manually re-keys information from one screen to another, is a silent killer of efficiency and accuracy.
Every manual entry is a potential point of failure. A mistyped contract start date, an incorrect product SKU, or a forgotten billing contact can lead to invoicing delays, revenue recognition problems, and frustrating conversations with your new customer. The cost isn’t just wasted time; it’s lost revenue, damaged customer trust, and a scalability ceiling that prevents your business from growing effectively. Integrating Salesforce and NetSuite directly addresses this critical gap, creating a seamless and automated flow of information that transforms your entire order-to-cash cycle.
The Hidden Costs of the “Swivel Chair” Interface
The gap between your sales and finance systems creates more than just administrative headaches. It introduces significant business risks and operational friction that can have a ripple effect across the entire organization. When an employee acts as the human bridge between Salesforce and NetSuite, the process is slow, expensive, and fragile.
Consider the direct consequences of this manual handoff:
- Delayed Invoicing and Cash Flow: The most immediate impact is on the speed of billing. The time it takes for a finance team member to receive the notification, find the contract details, and manually create a customer and sales order in NetSuite can be days or even weeks. This directly delays your first invoice and pushes out your cash collection timeline, negatively impacting your Days Sales Outstanding (DSO).
- Revenue Recognition Errors: For companies with subscription or recurring revenue models, accuracy is paramount. An incorrect service start date entered into NetSuite can cause revenue to be recognized in the wrong period, creating compliance headaches and requiring manual journal entries to correct the books.
- Poor Customer Experience: Nothing sours a new customer relationship faster than an incorrect first invoice. Whether it’s the wrong amount, a misspelled company name, or billing for the wrong product, these mistakes project an image of disorganization and require the customer to spend their own time helping you fix your internal problems.
- Wasted High-Value Labor: Your finance and operations professionals are skilled analysts, not data entry clerks. Every hour they spend transcribing information is an hour not spent on financial planning, analysis, or process improvement. This is an expensive and demoralizing use of their talent.
Imagine a common B2B scenario: A salesperson closes a complex, multi-year deal with three different software subscriptions, a one-time implementation fee, and custom payment terms. The details are captured in notes and attachments within the Salesforce Opportunity. Without an integration, the finance clerk must manually decipher this information to create a customer, set up multiple items on a sales order, and configure a custom billing schedule in NetSuite. A single mistake, like misinterpreting the start date for one of the subscriptions, could delay the entire invoice by a week and cause significant downstream reporting issues.
Mapping the Critical Data Flow: What to Sync and Why
A successful integration isn’t about replicating every field from Salesforce in NetSuite. It’s about creating a purposeful, reliable flow of the essential data needed to transition a customer from a sales prospect to a billed account. The key is to start with the “minimum viable sync” and avoid the trap of over-complicating the process from the start.
Key Objects to Synchronize
The flow typically begins when a deal is won in Salesforce and needs to become a financial record in NetSuite. Here are the core data objects that form the foundation of this connection:
- Accounts to Customers: The Salesforce Account record is the source of truth for who your customer is. When an opportunity closes for a new account, the integration should create a corresponding Customer record in NetSuite. Key fields to map include the company name, billing address, and primary contact information. For existing customers, the integration should identify and link to the existing NetSuite Customer record to avoid duplicates.
- Opportunities to Sales Orders: This is the primary trigger for the entire workflow. A “Closed Won” Opportunity in Salesforce contains the specifics of the deal and should generate a Sales Order in NetSuite. This Sales Order becomes the foundational transaction from which invoices and revenue plans are created.
- Products to Items: For your billing to be accurate, the products on the Salesforce Opportunity must have a direct equivalent in NetSuite’s item master. Maintaining a synchronized product catalog is crucial. When a sales rep adds a product to an opportunity, they are effectively selecting the “Item” that finance will use for invoicing and revenue recognition. This eliminates ambiguity and ensures consistency.
- Contracts and Subscriptions: For SaaS and other recurring revenue businesses, the contract details are vital. The integration should carry over critical data like the contract start date, end date, billing frequency (e.g., monthly, annually), and renewal terms. This information allows NetSuite to automatically generate renewal invoices and build accurate revenue recognition schedules.
Pitfall to Avoid: The “Sync Everything” Trap
A common mistake is to attempt a one-to-one mapping of every field, including dozens of custom fields sales teams use for their own reporting. This approach is brittle and creates a maintenance nightmare. A better strategy is to focus only on the data that the finance team absolutely requires to generate an accurate invoice and recognize revenue correctly. You can always add more fields to the integration later as new needs arise. Start lean and build from a solid foundation.
A Step-by-Step Guide to a Foundational Integration
While the specific tools may vary, the logical process for designing and implementing a robust Salesforce-to-NetSuite integration follows a consistent path. This structured approach ensures all stakeholders are aligned and critical details are not overlooked.
- Define the Trigger and Business Logic: First, determine the precise event in Salesforce that should initiate the data sync. Simply using the “Closed Won” stage might be premature if contracts are not yet signed. Many companies add a custom checkbox, such as “Ready for Billing,” which is checked by Sales Ops only after all paperwork is complete. This gatekeeping step prevents incomplete or inaccurate data from flowing into your financial system.
- Establish Data Ownership and a Master Source: A clear data governance rule is essential. Decide which system is the “master” for specific data points. For instance, Salesforce is typically the master for customer-facing information like contact details and shipping addresses. NetSuite, on the other hand, should be the master for all financial transaction data, such as invoice numbers, payment status, and credit memos. The integration should respect these boundaries, generally flowing data one way for specific objects.
- Map Core Data Fields: Create a detailed mapping document or spreadsheet that explicitly defines which Salesforce field populates which NetSuite field. This document is a critical blueprint for the developers or integration specialists.
Example Mapping:- Salesforce Account Name → NetSuite Customer Name
- Salesforce Opportunity Amount → NetSuite Sales Order Total
- Salesforce Opportunity Product Quantity → NetSuite Sales Order Item Quantity
- Salesforce Account Billing Address → NetSuite Customer Bill To Address
- Implement Robust Error Handling and Notifications: The integration will inevitably encounter errors. A record might fail to sync because a required field is missing, or a product SKU doesn’t exist in NetSuite. Your process must include a plan for these exceptions. The best practice is to automatically notify a specific person or team (like Sales Ops) with a clear message explaining the error and a link to the Salesforce record that needs correction. The goal is to fix the data at the source rather than making manual adjustments in NetSuite.
- Test Exhaustively in a Sandbox Environment: Before deploying to your live production environment, the integration must be thoroughly tested in a Salesforce sandbox and a NetSuite sandbox. The testing plan should cover a wide range of scenarios, including new customers, existing customers, simple one-product deals, complex multi-product orders, deals with discounts, and orders with different billing frequencies.
- Deploy, Monitor, and Iterate: After a successful testing phase, deploy the integration. For the first few weeks, closely monitor the logs and the records being created in NetSuite to catch any unforeseen issues. Treat the integration as a living process that may need adjustments as your business processes evolve.
Choosing Your Integration Approach: iPaaS vs. Custom Code
There are two primary ways to build the connection between Salesforce and NetSuite: using a third-party platform or building a custom solution from scratch. The right choice depends on your team’s technical capabilities, your budget, and the complexity of your requirements.
Integration Platform as a Service (iPaaS)
iPaaS solutions are cloud-based platforms designed to build and manage integrations between different applications. Well-known providers in this space include MuleSoft, Boomi, Workato, and Celigo. These platforms offer pre-built connectors for popular systems like Salesforce and NetSuite, which dramatically accelerates development.
Pros: They typically feature visual, low-code interfaces that allow business analysts to map fields and define logic without writing extensive code. They also manage the underlying infrastructure, security, and API updates for you, reducing your maintenance burden.
Cons: These platforms operate on a subscription model, which represents an ongoing operational expense. While they are very flexible, extremely complex or unique business logic might be difficult to implement without custom extensions.
Custom Development (Point-to-Point)
The alternative is to use your in-house development team to write custom code that connects the Salesforce and NetSuite APIs directly. This involves using Salesforce’s Apex and REST/SOAP APIs and NetSuite’s SuiteTalk web services.
Pros: This approach offers unlimited flexibility to build any logic you need. You have complete control over the solution and do not have to pay ongoing subscription fees to a third-party vendor.
Cons: The upfront cost in development hours is significantly higher. More importantly, you are solely responsible for maintaining the integration. When Salesforce or NetSuite updates their APIs, your code may break, requiring immediate attention from your developers. This can create a fragile and high-maintenance solution if not managed properly.
Decision Checklist
To help you decide, consider the following questions:
- Do we have experienced in-house developers with deep expertise in both Salesforce and NetSuite APIs?
- What is our budget for the initial implementation versus ongoing subscription and maintenance costs?
- How quickly do we need this solution to be live?
- How complex and unique are our data transformation and business rules?
- Who will be responsible for monitoring and maintaining the integration long-term?
Measuring Success: Metrics That Matter for Finance and Ops
The goal of this integration is to drive tangible business value. To prove its worth and justify the investment, you must track the right key performance indicators (KPIs). Success isn’t just about whether the data syncs; it’s about how that synced data improves your business operations.
Focus on these core metrics before and after implementation:
- Order-to-Cash Cycle Time: This is one of the most important metrics. Measure the average time from the moment an Opportunity is marked “Closed Won” in Salesforce to the moment the first invoice is generated and sent from NetSuite. A successful integration should reduce this time from days or weeks to minutes or hours.
- Billing Error Rate: Track the number of invoices that need to be corrected and reissued due to data entry mistakes during the initial setup. This includes errors in pricing, quantity, customer details, or billing terms. This metric should drop dramatically, approaching zero for setup-related errors.
- Reduction in Manual Labor: Survey your finance and operations teams to quantify the amount of time they spent manually entering order data before the integration. After implementation, measure the time saved. This “soft” cost savings is significant, as it frees up your team to focus on higher-value activities like financial analysis and strategic planning.
- Days Sales Outstanding (DSO): While many factors influence DSO, getting accurate invoices out the door faster is a critical first step to getting paid on time. Monitor your DSO for a positive trend in the quarters following the integration go-live.
Data Governance and Security: Protecting Your Most Critical Information
Connecting two of your most critical business systems requires a thoughtful approach to security and data governance. You are handling sensitive customer and financial information, and protecting it is non-negotiable.
Implement the Principle of Least Privilege: The integration should use a dedicated service account with a specific, limited permission set. This account should only have the permissions necessary to perform its functions, for example, reading specific objects in Salesforce and creating specific records in NetSuite. It should never have full administrator privileges in either system.
Enforce Data Quality at the Source: The integration can’t fix bad data. Use Salesforce’s native features, like validation rules and making fields required, to ensure data is clean and complete before it’s sent to NetSuite. For example, make the “Billing Contact” and “Billing Address” fields on an Account required before an associated Opportunity can be closed.
Consider a “Human in the Loop” for Complex Orders: Full automation isn’t always the best solution for every scenario. For exceptionally large, complex, or non-standard deals, you can configure the integration to create a draft Sales Order in NetSuite that is pending approval. A member of the finance team can then give it a final review and approve it with a single click. This hybrid approach combines the speed of automation with the critical oversight of human expertise.
Ensure Comprehensive Logging and Auditing: Your integration solution, whether it’s an iPaaS platform or custom code, must maintain a detailed log of every transaction. This log should record what data was synced, when it was synced, and whether it was successful. These audit trails are invaluable for troubleshooting problems and are often a requirement for compliance standards like SOX and SOC 2.
The Path Forward: Your Next Steps
Eliminating the manual swivel-chair process between sales and finance is more than an efficiency gain; it is a foundational step in building a scalable business. It ensures data integrity, accelerates cash flow, and enables your teams to focus on strategic growth instead of manual data repair. An automated, reliable bridge between Salesforce and NetSuite is no longer a luxury, but a core component of a modern, high-functioning back office.
To begin this journey, follow a clear, methodical plan:
- Assemble the Stakeholders: Schedule a meeting with the leaders of Sales, Finance, and IT. Everyone must have a shared understanding of the current problems and a unified vision for the solution.
- Document the Current State: Map out your existing order-to-cash process in detail. Identify every manual step, every handoff, and every point where errors or delays occur. This document will be your baseline.
- Define and Quantify Your Goals: Use the metrics discussed earlier to set specific, measurable targets. For example, aim to “reduce the order-to-invoice time from 5 days to 4 hours” or “cut billing setup errors by 90% within six months.”
- Evaluate Your Technical Options: With your goals and process defined, you can now have an informed discussion about whether an iPaaS solution or a custom development project is the right fit for your company’s budget, timeline, and technical resources.
By taking these deliberate steps, you can move from a state of reactive problem-solving to proactive, scalable growth, powered by systems that work together seamlessly.
Your Next Read:
Category:
Get a FREE
Proof of Concept
& Consultation
No Cost, No Commitment!