

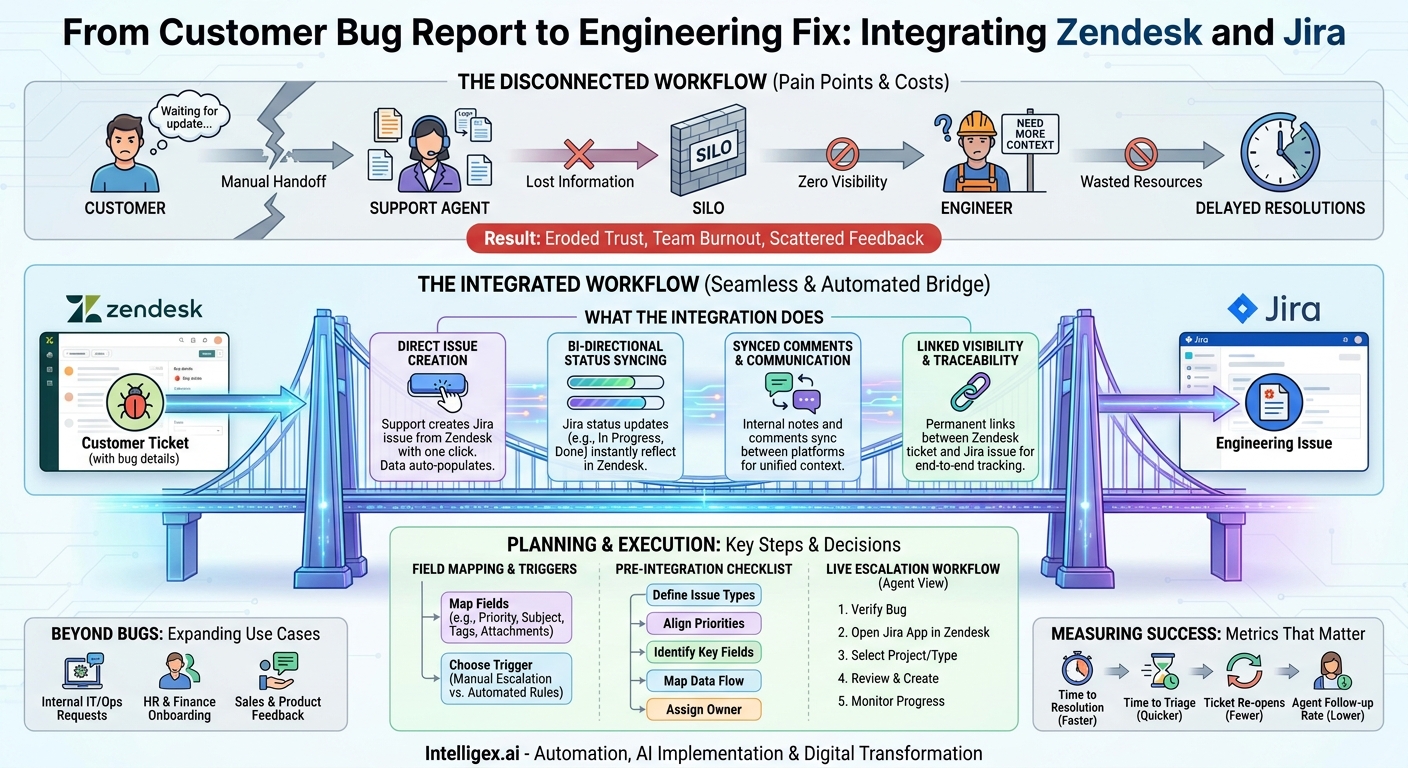
When a customer reports a bug, the clock starts ticking. Every moment that ticket sits in a queue, waiting for a manual handoff from your support team to your engineering team, is a moment of friction. The support agent copies and pastes information, the engineer asks for more context, and the customer is left waiting for an update. This disjointed process doesn’t just slow down fixes; it erodes customer trust, burns out your teams, and leaves valuable product feedback scattered across disconnected systems.
The solution isn’t to ask your support agents to become Jira experts or to give your engineers direct access to the support queue. The solution is to build a seamless, automated bridge between your customer support platform and your engineering backlog. By integrating Zendesk and Jira, you can transform customer-reported issues into trackable, actionable engineering work, creating a single, transparent pipeline from problem to resolution.
The True Cost of a Disconnected Workflow
The manual process of transferring information from a support ticket to an engineering task seems like a small inconvenience, but its cumulative impact on the business is significant. The friction it creates manifests as direct costs, operational drag, and a diminished capacity to improve your products and services.
Here’s where the pain is felt most acutely:
- Wasted Resources: Every minute a support agent spends manually creating a Jira ticket is a minute they are not helping another customer. Likewise, every minute an engineer spends chasing down logs or clarifying bug reports that were poorly transcribed is a minute they are not writing code. This context switching and administrative overhead represents a direct operational cost.
- Delayed Resolutions: The lag time between a bug being identified in Zendesk and a ticket being created, triaged, and assigned in Jira directly extends your resolution time. For critical, revenue-impacting bugs, these delays can have immediate financial consequences and increase customer churn.
- Loss of Information: Details get lost in translation. A support agent might forget to include a specific browser version, a crucial log file, or the exact steps to reproduce the issue. This incomplete information forces engineers to go back to the support team, adding more delays and frustrating everyone involved. The full customer story rarely makes it into the engineering task.
- Zero Visibility: Without a direct link, the support team is blind to the status of an escalated bug. They cannot give customers accurate updates, leading to generic responses like “our team is looking into it.” At the same time, product managers and engineering leads have no easy way to quantify how many customer-reported issues are flowing into their backlog, making it difficult to prioritize fixes based on real-world impact.
Bridging the Gap: What a Zendesk-Jira Integration Actually Does
A native or third-party integration creates a two-way communication channel between Zendesk tickets and Jira issues. It’s not just a simple link; it’s a dynamic connection that ensures both systems stay in sync throughout the bug lifecycle. This creates a single source of truth, empowering both teams to work more effectively from within their preferred tools.
The core functionalities of a well-configured integration include:
- Direct Issue Creation: A support agent can create a Jira issue directly from the Zendesk ticket interface with a few clicks. Key information like the ticket title, description, and attachments are automatically carried over, eliminating manual data entry.
- Bi-directional Status Syncing: When an engineer moves the Jira issue from “To Do” to “In Progress” or “Done,” the status of the linked Zendesk ticket can be updated automatically. This gives the support agent real-time visibility without ever leaving Zendesk.
- Synced Comments and Communication: The integration can be configured to sync comments between the platforms. An engineer can post an internal note in Jira asking for more information, which then appears as an internal note in the Zendesk ticket for the agent. This keeps all communication related to the issue in one place.
- Linked Visibility: The Zendesk ticket will permanently display a link to its corresponding Jira issue, and the Jira issue will link back to the source Zendesk ticket. This provides complete traceability from the initial customer report all the way to the code commit that fixed it.
Planning Your Integration: Key Decisions to Make Upfront
A successful integration is built on a foundation of clear rules and shared understanding between your support and engineering teams. Before you enable any connection, it’s crucial to map out your desired workflow and align on the process. Rushing this step often leads to a messy implementation that creates more noise than signal.
Field Mapping: The Foundation of Your Workflow
Field mapping determines what information from Zendesk gets populated into which field in Jira. A thoughtful mapping strategy ensures that engineers receive consistent, high-quality information every time. You need to decide, for example, how a Zendesk ticket’s priority level (Low, Normal, High, Urgent) translates to your Jira priority schema (Lowest, Low, Medium, High, Highest).
Common mappings include:
- Zendesk Ticket Subject → Jira Issue Summary
- Zendesk Ticket Description → Jira Issue Description
- Zendesk Ticket Requester → Custom Field in Jira (e.g., “Reported by”)
- Zendesk Ticket Tags → Jira Issue Labels
- Zendesk Attachments → Jira Issue Attachments
Don’t forget about custom fields. If you use a custom dropdown field in Zendesk to categorize the type of issue (e.g., “UI Glitch,” “Performance,” “Data Error”), you can map this directly to a “Component” or custom field in Jira.
Workflow Triggers: When and How to Create a Jira Issue
You have two primary options for creating Jira issues: manual or automated. The right choice depends on your ticket volume and how you want to control the flow of information to engineering.
- Manual Creation: The support agent decides when a ticket warrants escalation and clicks a button in the Zendesk app to create the Jira issue. This approach provides a human gatekeeper, ensuring that only legitimate, well-documented bugs are sent to engineering. It prevents the backlog from being flooded with duplicates or user-error issues.
- Automated Creation: You can configure a trigger in Zendesk to automatically create a Jira issue when certain conditions are met. For example, a Jira issue could be created instantly if a ticket is assigned to a specific support group (e.g., “Tier 3 Support”) or if it receives a specific tag (e.g., “bug_confirmed”). This ensures consistency and speed but requires very clear and strictly followed support processes to avoid sending noise to engineering.
Your Pre-Integration Checklist
Before you begin the technical setup, run through this checklist with stakeholders from both support and engineering:
- Define Jira Issue Types: Confirm which Jira issue types are appropriate for support escalations. Common choices include “Bug,” “Task,” or a custom type like “Customer Issue.”
- Align on Priorities: Create a simple, shared definition for each priority level so that a “High” priority ticket in Zendesk means the same thing to an engineer in Jira.
- Identify Key Fields: Document the critical pieces of information engineers always need to investigate a bug (e.g., User ID, Browser Version, Error Message) and ensure you have fields for them in Zendesk.
- Map the Data Flow: Create a simple diagram or document showing which Zendesk fields map to which Jira fields and how status updates should sync.
- Assign an Owner: Designate one person who is responsible for managing the integration’s configuration and troubleshooting any issues.
A Step-by-Step Guide to a Live Escalation
Once the integration is planned and configured, the day-to-day workflow for a support agent becomes remarkably simple and efficient. Instead of juggling multiple tabs and copy-pasting text, the entire process happens within Zendesk.
Here is a typical workflow from the agent’s perspective:
- Identify and Verify the Bug: An agent works with a customer on a ticket and, after initial troubleshooting, confirms that the issue is a legitimate product bug that requires engineering intervention.
- Open the Jira App in Zendesk: The agent opens the Jira integration, which appears in the app sidebar of the Zendesk ticket interface.
- Select the Project and Issue Type: The agent chooses the correct Jira project (e.g., “Web App” or “Mobile API”) and the appropriate issue type (e.g., “Bug”). This ensures the issue is routed to the right engineering team from the start.
- Review Pre-Populated Fields: The integration automatically populates the Jira issue’s summary and description based on the Zendesk ticket’s subject and first comment. The agent can edit or add more technical context directly in this view.
- Create the Jira Issue: The agent clicks “Create Issue.” In the background, the integration securely communicates with Jira and creates the new issue, instantly linking it back to the Zendesk ticket.
- Monitor Progress from Zendesk: The Zendesk ticket now displays a panel showing the linked Jira issue’s ID, status, and assignee. As the engineer works on the issue in Jira, the agent sees the status change in real time, allowing them to provide proactive and accurate updates to the customer.
Beyond Bugs: Expanding the Integration Across Your Business
The power of connecting a service desk with a project management tool extends far beyond the traditional customer support-to-engineering pipeline. Any team that receives requests and manages them as structured work can benefit from this model. By thinking of Zendesk as a “front door” for requests and Jira as the “workshop” where the work gets done, you can streamline processes across the entire organization.
- Internal IT and Operations: An employee submits a ticket to the internal IT help desk in Zendesk for a software license or a system access request. The IT agent can instantly create a linked Jira task for the systems administrator to provision the access, providing a full audit trail.
- Finance and HR Teams: A manager submits a request through an HR service portal (powered by Zendesk) for a new employee’s onboarding. This can automatically generate a parent Jira epic with child tasks for IT (provision hardware), HR (complete paperwork), and Finance (set up payroll).
- Sales and Product Teams: A salesperson logs valuable customer feedback from a call into Zendesk. If that feedback represents a significant feature request, the support agent or product liaison can create a Jira “Story” or “Improvement” issue directly from the ticket, ensuring the voice of the customer is captured in the product backlog.
Measuring Success: Metrics That Matter
To understand the business value of your integration, you need to track the right metrics. The goal is to measure improvements in speed, quality, and visibility. Avoid vanity metrics and focus on indicators that reflect real changes in your operational efficiency and customer experience.
- Time to Resolution: This is the ultimate outcome metric. Measure the total time from the creation of a customer ticket in Zendesk to the resolution of the linked Jira issue. A successful integration should steadily drive this number down.
- Time to Triage: Measure the time from Zendesk ticket creation to the creation of a linked Jira issue. This metric specifically tracks the speed of your support escalation process.
- Ticket Re-opens Related to Bugs: If customers frequently re-open tickets because a bug fix didn’t work or was incomplete, it may indicate that engineers aren’t getting enough context. As the quality of information in Jira improves, this metric should decrease.
- Support Agent Follow-up Rate: Track how often agents have to manually ask engineers for status updates. With automated status syncing, this should become rare.
Governance and Security: Integrating Responsibly
Connecting two powerful systems requires a thoughtful approach to data security and governance. While the integration automates communication, human oversight is essential to ensure that sensitive information is handled correctly and that access is properly controlled.
Keep these principles in mind:
- Control Data Flow: Be selective about what you sync. Customer conversations can sometimes contain personally identifiable information (PII) or other sensitive data. Configure your field mapping to sync only the necessary technical details to Jira, rather than the entire thread of a conversation.
- Use Dedicated Service Accounts: Set up the integration using dedicated user accounts in both Zendesk and Jira with the minimum permissions required. This avoids granting overly broad access and creates a clear audit trail for all automated actions performed by the integration.
- Manage Comment Visibility: Decide carefully which comments should be shared between systems. You can configure the integration to sync only internal notes, preventing sensitive engineering discussions from accidentally becoming visible to customers. Conversely, you can prevent general customer replies from cluttering the Jira issue.
Your Next Steps to a Seamless Workflow
Integrating Zendesk and Jira is more than a technical project; it is a strategic initiative to align your teams, accelerate your response times, and build better products based on direct customer feedback. By removing manual friction, you free up your teams to focus on the high-value work they were hired to do.
To get started, follow these simple steps:
- Assemble a Team: Bring together key stakeholders from Customer Support, Engineering, and Product Management to discuss current pain points and define what a successful workflow looks like.
- Document the Current State: Map out your existing bug escalation process. Identify the specific steps where delays occur and information is lost. This will become the baseline for measuring improvement.
- Start Small: You don’t need to roll this out to the entire organization at once. Choose a single support group and a single engineering project for a pilot program. Learn from this initial implementation before expanding.
- Define Success: Before you start, agree on the key metrics you will use to measure the success of the integration. This ensures everyone is aligned on the goals and can celebrate the wins as you achieve them.
Your Next Read:
Get a FREE
Proof of Concept
& Consultation
No Cost, No Commitment!