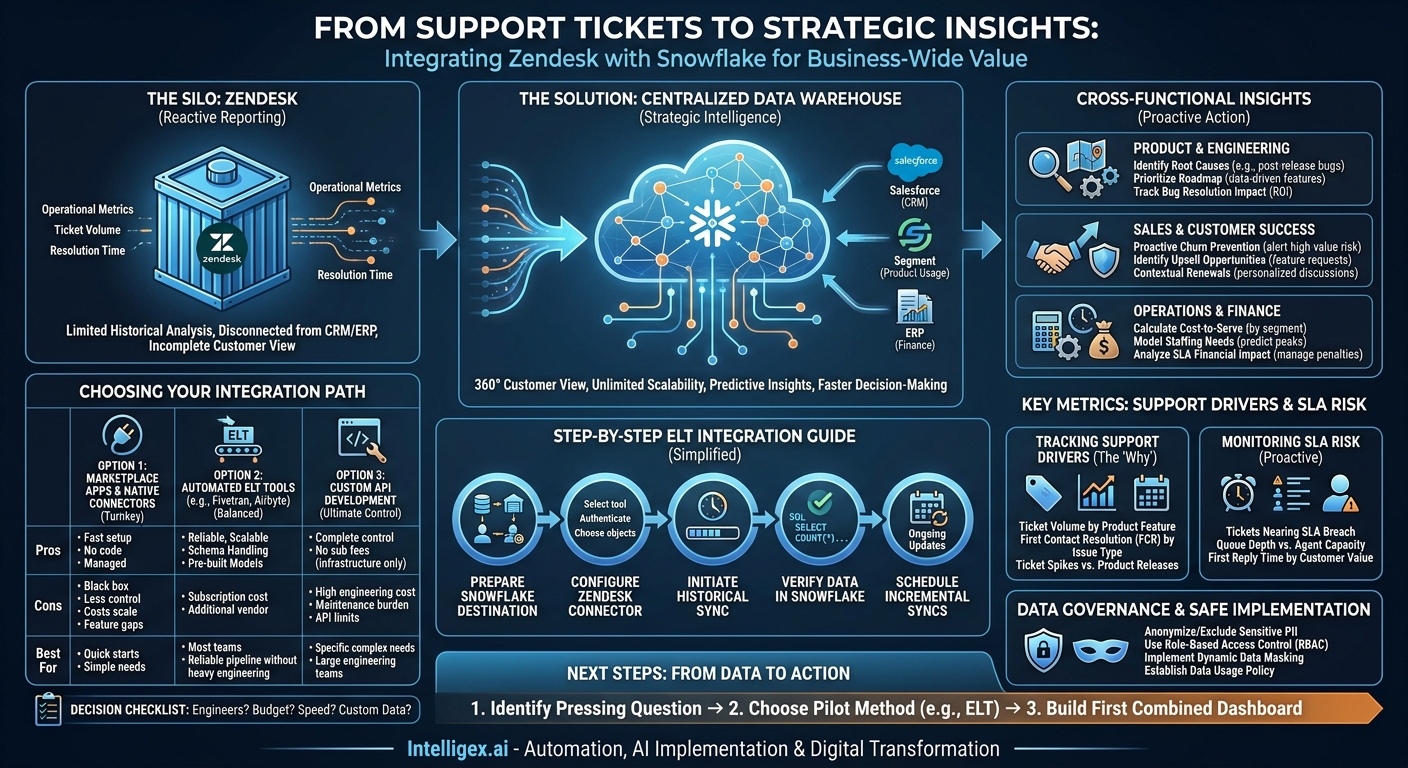
Your support team is on the front lines, managing customer relationships one ticket at a time. The data they generate in Zendesk is a goldmine of information about your product, your processes, and your customers’ health. Yet for most organizations, this goldmine remains largely untapped. Reporting within Zendesk is great for day-to-day support operations, but it creates a data silo. You can see what happened in a ticket, but you can’t easily see why it happened in the context of the entire business or what its downstream impact will be.
What if you could directly correlate a spike in support tickets with a recent feature release? Or measure the impact of slow response times on the renewal probability for your highest-value customers? Answering these critical questions requires breaking down data silos. By integrating Zendesk with a central data warehouse like Snowflake, you transform raw support data into a strategic asset that drives decisions across your entire organization, from product development to finance.
Why Your Business Needs More Than Zendesk’s Built-in Reports
Zendesk Explore provides powerful dashboards for managing support team performance. You can track first response time, resolution time, and customer satisfaction scores with ease. However, these reports exist in a vacuum, isolated from the rest of your business data. This isolation creates significant limitations.
The Limits of Siloed Support Data
When your Zendesk data lives apart from your other systems, you face several challenges. You can’t perform historical analysis on massive datasets without performance degradation. You can’t join support interactions with data from your CRM, product analytics, or financial systems. This means you are always looking at an incomplete picture. You might see a rise in tickets about “billing issues,” but you can’t see if those tickets are coming from a specific customer segment, a new pricing tier, or a region where a new sales campaign just launched.
The Business Value of a Centralized Data Warehouse
Moving your Zendesk data into a cloud data platform like Snowflake unlocks immediate and long-term business value. It is not just about better reporting; it is about creating a single source of truth for all customer-related data.
- Complete Visibility: Combine ticket data with customer information from Salesforce, product usage data from Segment, and financial data from your ERP. This 360-degree view allows you to understand the full context of every customer interaction.
- Unlimited Scalability: A data warehouse is built to handle billions of rows of data. You can store years of ticket history and run complex queries in seconds, something that is simply not feasible within an application’s native reporting tool.
- Higher Quality Insights: By blending datasets, you move from reactive metrics (like ticket volume) to predictive insights. You can start building models to identify customers at risk of churn based on their support history and product usage patterns.
- Increased Speed and Agility: Business teams can self-serve answers to their own questions using BI tools connected to Snowflake, without needing to file a request with the data team for every new report. This accelerates decision-making across the board.
Unlocking Cross-Functional Insights: Use Cases for Every Team
Integrating Zendesk and Snowflake isn’t just a project for the IT or support departments. It provides actionable intelligence for nearly every function in the business. By connecting support activity to business outcomes, you can start answering your organization’s most pressing questions.
For Product and Engineering Teams
Product managers and engineers are constantly trying to understand how their work impacts the user experience. Raw ticket data is the most direct form of user feedback you have.
- Identify Root Causes: Correlate ticket creation dates and keywords with product release dates. Did a recent update cause a spike in tickets with the tag “login_error”? This direct feedback loop allows you to pinpoint and fix bugs faster.
- Prioritize the Roadmap: Quantify the pain points. Instead of relying on anecdotes, you can say, “25% of all feature-related tickets in the last quarter were about our new reporting dashboard.” This data-driven approach helps prioritize features that will have the greatest impact on reducing support load and improving customer satisfaction.
- Track Bug Resolution Impact: Measure the decline in ticket volume for a specific issue after a patch is deployed, proving the ROI of engineering efforts.
For Sales and Customer Success Teams
Understanding a customer’s support history is crucial for retention and expansion. A customer who seems happy on the surface might be quietly struggling with your product.
- Proactive Churn Prevention: Create alerts for account managers when a high-value customer logs a severe ticket or has multiple tickets open simultaneously. This allows them to engage proactively before the customer becomes frustrated.
- Identify Upsell Opportunities: Are customers on a lower-tier plan constantly asking for features available in a higher-tier plan? This is a warm lead for an upsell conversation, directly sourced from your support data.
- Contextual Renewals: Arm your renewal managers with a complete history of a customer’s support experience. Knowing their challenges and successes allows for a more personalized and effective renewal discussion.
For Operations and Finance Teams
The cost of customer support is a significant operational expense. Optimizing this cost while maintaining quality requires deep, data-driven analysis.
- Calculate Cost-to-Serve: By joining agent time-tracking data with ticket volume and CRM data, you can calculate the true support cost for different customer segments, products, or contract sizes. Are you over-servicing low-revenue customers or under-resourcing strategic accounts?
- Model Staffing Needs: Analyze historical ticket volume by time of day, day of the week, and season. This allows you to build accurate staffing models that prevent agent burnout and ensure you meet SLAs during peak periods.
- Analyze SLA Financial Impact: If your contracts include financial penalties for SLA breaches, you can model and track this risk directly in Snowflake, providing a clear financial justification for investing in support resources.
Choosing Your Integration Path: A Practical Comparison
Once you have decided to move your Zendesk data, the next question is how. There are three primary methods, each with its own trade-offs in terms of cost, complexity, and flexibility. The right choice depends on your team’s technical expertise, budget, and long-term data strategy.
Option 1: Marketplace Apps and Native Connectors
Zendesk has a marketplace with apps that offer pre-built connectors to various data warehouses. These are often the fastest way to get started.
- Pros: Turnkey setup, often requiring no code. Managed by the vendor, so there is no ongoing maintenance.
- Cons: Can be a “black box” with little control over data schemas or transformation logic. Costs can add up, and they may not support all custom fields or objects you rely on.
Option 2: Automated ELT (Extract, Load, Transform) Tools
Third-party ELT platforms like Fivetran or Airbyte are purpose-built to move data from source systems like Zendesk into data warehouses like Snowflake. They handle the entire pipeline automatically.
- Pros: Highly reliable and scalable. They automatically adapt to API changes and schema updates from the source, saving significant engineering time. They offer pre-built, normalized schemas that are optimized for analytics.
- Cons: These services come with a subscription cost, which is typically based on data volume. It introduces another vendor into your technology stack.
Option 3: Custom API Development
For ultimate control, you can build your own data pipeline using the Zendesk API to extract data and custom scripts to load it into Snowflake.
- Pros: Complete control over every aspect of the data pipeline, from what data is extracted to how it is transformed and loaded. No subscription fees beyond your own infrastructure and development costs.
- Cons: Requires significant, specialized engineering resources to build and, more importantly, to maintain. You are responsible for handling API rate limits, schema changes, error handling, and monitoring, which can become a major ongoing operational burden.
How to Decide: A Quick Checklist
Use these questions to guide your decision:
- Do we have dedicated data engineers? If no, a custom build is likely off the table. An ELT tool is a strong contender.
- What is our budget? Compare the subscription cost of an ELT tool against the fully-loaded cost of an engineer’s time to build and maintain a custom pipeline.
- How quickly do we need this data? Marketplace apps and ELT tools can often be set up in a day. A custom build can take weeks or months.
- Do we need to sync custom objects or highly specific data? If yes, a custom build might be necessary, though modern ELT tools are increasingly flexible.
A Step-by-Step Guide to an ELT-Powered Integration
Using an automated ELT tool is often the most balanced approach for teams that want a reliable, scalable pipeline without a massive engineering investment. Here is a high-level overview of the process using a tool like Fivetran as an example.
- Prepare Your Snowflake Destination: Before you can send data, you need a place for it to land. This involves setting up the necessary components in your Snowflake account. You will need to create a dedicated database for your Zendesk data, a virtual warehouse to provide the compute power for loading, a user for the ELT tool to connect with, and a role with the correct permissions to write data.
- Configure the Zendesk Connector in Your ELT Tool: This is typically a straightforward process. You will log into your ELT platform, select “Add Connector,” and choose Zendesk. The tool will then prompt you for authentication details, which usually involves providing your Zendesk subdomain and authenticating via OAuth. You will also select which Zendesk objects (tickets, users, organizations, etc.) you want to sync.
- Initiate the Initial Historical Sync: Once the connector is configured, the tool will begin the “historical sync.” It will pull all of the historical data for the objects you selected from Zendesk’s API. This can take anywhere from a few minutes to many hours, depending on the volume of your Zendesk data. The ELT tool manages this process, handling API rate limits and ensuring all data is transferred completely.
- Verify the Data in Snowflake: After the initial sync is complete, log into Snowflake and check that the data has arrived as expected. You should see a new schema created by the ELT tool, with tables corresponding to your Zendesk data (e.g., `TICKET`, `USER`, `ORGANIZATION`). You can run a simple query like
SELECT COUNT(*) FROM ZENDESK.TICKETS;to verify that the records have been loaded. - Schedule Ongoing Incremental Syncs: The real power of an ELT tool is its ability to keep your data fresh. After the initial load, the tool will automatically perform incremental updates, syncing only the new or changed data from Zendesk. You can typically configure the sync frequency, such as every 5 minutes, every hour, or once a day, ensuring your data warehouse is always up-to-date.
Key Metrics to Track for Support Drivers and SLA Risk
With Zendesk data flowing into Snowflake and joined with your other business data, you can build dashboards that go far beyond standard support metrics. You can now measure the things that truly drive the business forward.
Tracking Support Drivers
Understand the “why” behind your ticket volume to address root causes, not just symptoms.
- Ticket Volume by Product Feature: Use custom fields or tags in Zendesk to categorize tickets by product area. Analyzing this in Snowflake reveals which parts of your product are creating the most support load.
- First Contact Resolution (FCR) by Issue Type: Are certain types of problems (e.g., “password reset”) being resolved on the first try, while others (e.g., “integration setup”) require multiple interactions? This helps identify areas for better documentation or agent training.
- Ticket Spikes vs. Product Releases: Join ticket creation data with your product release schedule from Jira or a similar tool. This creates a clear visual timeline of how product changes affect your support team.
Monitoring SLA Risk
Move from reactively reporting on missed SLAs to proactively identifying tickets that are in danger of breaching them.
- Tickets Nearing SLA Breach: Create a view in Snowflake that calculates the time remaining on each ticket’s SLA. A BI tool can then visualize all tickets that are at 75% or more of their SLA time, allowing managers to intervene before it is too late.
- Queue Depth vs. Agent Capacity: Analyze the number of open tickets assigned to each agent or team against their historical resolution capacity. This can help predict bottlenecks and justify the need for additional resources.
- First Reply Time by Customer Value: Join ticket data with revenue data from your CRM. Are your top-tier customers getting a faster first reply than your standard customers, as promised in their contracts? This metric is impossible to track without joining the two datasets.
Data Governance and Safe Implementation
Customer support tickets often contain sensitive information, including Personally Identifiable Information (PII). When you move this data into a central warehouse, establishing strong governance and security practices is not optional; it is a requirement.
First, be mindful of what you are syncing. Anonymize or exclude sensitive custom fields if they are not needed for analysis. Once the data is in Snowflake, leverage its powerful security features. Use Role-Based Access Control (RBAC) to ensure that users can only see the data they are authorized to see. For example, a marketing analyst might need to see aggregated ticket trends but should not have access to the raw text of a ticket, which could contain personal details.
For highly sensitive fields, consider using Snowflake’s dynamic data masking policies. This allows you to mask data in a column based on a user’s role, showing the full data to a privileged user (like a compliance officer) while showing only masked or redacted data to others. Finally, establish a clear data usage policy. Document who owns the data, how it can be used, and create a process for reviewing any automated systems or AI models that are trained on this data to ensure fairness and prevent privacy violations.
Next Steps: From Data to Action
Integrating Zendesk with Snowflake is a foundational step in becoming a truly data-driven organization. It moves your customer support function from a cost center to a strategic intelligence hub. The insights you uncover can improve your product, increase customer retention, and optimize your operations.
Getting started does not have to be a massive, multi-year project. You can achieve significant value by taking a focused, iterative approach.
- Identify Your Most Pressing Question: Start by defining one critical business question that you cannot answer with Zendesk alone. For example, “Which of our enterprise customers are most at risk of churn based on their support ticket history?”
- Choose a Pilot Integration Method: Based on your team’s skills and budget, select an integration path for a proof of concept. An ELT tool often provides the fastest time-to-value for an initial pilot.
- Build Your First Combined Dashboard: Connect a BI tool to Snowflake and build one dashboard that answers your critical question. Share it with stakeholders to demonstrate the power of connected data and build momentum for a wider rollout.
By taking these concrete steps, you can begin the journey of transforming your support data from a simple operational record into a powerful engine for business growth.
Your Next Read:
Category:
Get a FREE
Proof of Concept
& Consultation
No Cost, No Commitment!